超详细!OFA 视觉问答(VQA)模型部署教学(避坑完整版)
本文为 ModelScope 英文 OFA VQA 模型 iic/ofa_visual-question-answering_pretrain_large_en 的 Linux(Miniconda)部署全流程:覆盖清华镜像、transformers/tokenizers/huggingface-hub 固定版本组合,以及通过环境变量禁用 ModelScope 自动改依赖的关键步骤。文中给出可直接运行的 test.py(本地图或 HTTPS URL + 英文问题,输入为元组格式),并整理了依赖冲突、403 测试图、trust_remote_code、tuple 输入与各类告警等常见问题对照表。
前言
大家好~ 最近尝试部署 OFA 视觉问答(VQA)模型,过程中踩了无数个依赖版本、输入格式、权限相关的坑,耗时很久才成功运行并输出正确结果。为了避免大家重复踩坑,今天整理了一份完整、可复现的部署教学,从环境准备到脚本运行,每一步都标清细节,连遇到的坑都附带「现象+原因+解决方案」,新手也能轻松上手!
一、前言:什么是 OFA VQA 模型?
OFA(One For All)是字节跳动提出的多模态预训练模型,支持视觉问答、图像描述、图像编辑等多种任务,其中视觉问答(VQA)是最常用的功能之一——输入一张图片和一个英文问题(该模型仅支持英文),模型就能输出对应的答案(比如输入“瓶子”图片+问题“What is the main subject?”,输出“a water bottle”)。
本次部署使用 ModelScope 平台的 iic/ofa_visual-question-answering_pretrain_large_en 模型,基于 Python 虚拟环境(Miniconda)部署,全程在 Linux 环境下操作(Windows 可参考,命令略有差异)。
二、前置准备
1. 环境基础
- 系统:Linux(Ubuntu/CentOS 均可,本次用 Ubuntu)
- 工具:Miniconda(用于创建独立虚拟环境,避免环境污染)
- Python 版本:3.11(亲测兼容,3.9-3.11 均可,不建议 3.12+,部分依赖不支持)
- 网络:能访问 ModelScope、PyPI 源(建议换清华源,提速)
2. 提前说明
本次部署的核心难点的是「依赖版本匹配」——ModelScope 平台的 OFA 模型会硬编码依赖版本,运行时会自动卸载你安装的版本并强制安装指定版本,很容易导致版本冲突;其次是「输入格式适配」和「图片加载权限」问题,这两个坑也很容易卡壳,后面会详细说明。
三、完整部署步骤(一步都不能少)
步骤 1:创建并激活虚拟环境(关键!避免环境污染)
为什么要创建虚拟环境?因为不同模型的依赖版本差异很大,比如本次 OFA 模型对 transformers、tokenizers 的版本要求很严格,和其他模型可能冲突,独立虚拟环境能隔离这些差异。
打开终端,执行以下命令(全程复制即可):
# 1. 激活 Miniconda(如果没配置环境变量,先执行这个,具体路径根据自己的 Miniconda 安装位置修改)
source /opt/miniconda3/bin/activate

# 2. 创建虚拟环境(环境名:torch27,Python 版本 3.11,可自定义环境名)
conda create -n torch27 python=3.11 -y

# 3. 激活创建好的虚拟环境(后续所有操作都要在这个环境里执行)
conda activate torch27
执行成功后,终端前缀会显示 (torch27),说明已经进入虚拟环境。
步骤 2:配置清华 PyPI 源(提速,避免下载依赖超时)
默认 PyPI 源在国外,下载依赖很慢,甚至会超时,建议配置清华源,执行以下命令:
pip config set global.index-url https://pypi.tuna.tsinghua.edu.cn/simple
配置成功后,后续用 pip 安装依赖会自动走清华源,速度翻倍。
步骤 3:创建工作目录,下载模型相关文件
创建一个单独的工作目录,用于存放脚本、图片等文件,避免文件混乱:
# 1. 创建工作目录(路径可自定义,本次用 /root/workspace/ofa_visual-question-answering)
mkdir -p /root/workspace/ofa_visual-question-answering

# 2. 进入工作目录(后续所有操作都在这个目录下)
cd /root/workspace/ofa_visual-question-answering
步骤 4:安装核心依赖(重点!版本必须完全匹配)
这是部署过程中最容易踩坑的一步!OFA 模型对依赖版本要求极高,尤其是 transformers、tokenizers、huggingface-hub 这三个库,版本不匹配会直接导致模型无法初始化,甚至报错。
先给大家上「最终可用的依赖版本组合」(亲测可复现,避免踩坑):
- tensorboardX==2.6.4(模型日志相关,版本可兼容)
- huggingface-hub==0.25.2(ModelScope 硬编码要求,不能高也不能低)
- transformers==4.48.3(ModelScope 硬编码要求,对应 tokenizers 0.21.4)
- tokenizers==0.21.4(必须和 transformers 4.48.3 匹配,否则报错)
- modelscope(模型加载平台,直接安装最新版即可)
- Pillow、requests(图片加载相关,必备)
执行以下命令,一次性安装所有依赖(顺序不要乱,避免版本冲突):
# 1. 先安装 tensorboardX(无版本冲突,放心装)
pip install tensorboardX==2.6.4

# 2. 安装 ModelScope 硬编码要求的核心依赖(重点!版本不能改)
pip install huggingface-hub==0.25.2 tokenizers==0.21.4 transformers==4.48.3

# 3. 安装 modelscope(最新版即可,负责加载 OFA 模型)
pip install modelscope

# 4. 安装图片加载相关依赖(Pillow 处理本地图片,requests 处理在线图片)
pip install Pillow requests
安装过程中如果出现「WARNING: Running pip as the ‘root’ user」警告,可忽略,不影响功能(这是提示用 root 用户运行 pip 可能有权限问题,但不影响模型部署)。
安装完成后,验证一下版本是否正确(避免安装出错):
python -c "import transformers, tokenizers, huggingface_hub; print(f'transformers: {transformers.__version__}'); print(f'tokenizers: {tokenizers.__version__}'); print(f'huggingface-hub: {huggingface_hub.__version__}')"
正常输出如下(版本必须完全一致):
transformers: 4.48.3
tokenizers: 0.21.4
huggingface-hub: 0.25.2
如果输出的版本不一致,重新执行步骤 4 的安装命令,确保版本正确。
步骤 5:禁用 ModelScope 自动依赖安装(核心避坑操作)
这是最关键的避坑步骤!ModelScope 加载 OFA 模型时,会自动检查依赖版本,如果发现版本和它硬编码的要求不一致,会直接卸载你的版本并强制安装指定版本——哪怕你已经安装了正确的版本,也会被覆盖,导致之前的努力白费。
所以,我们需要设置环境变量,禁用 ModelScope 自动安装/升级依赖,执行以下命令:
# 禁用 ModelScope 自动安装依赖(临时生效,仅当前终端会话)
export MODELSCOPE_AUTO_INSTALL_DEPENDENCY='False'
export PIP_NO_INSTALL_UPGRADE=1
export PIP_NO_DEPENDENCIES=1
⚠️ 注意:如果后续新开终端、重新激活虚拟环境,需要重新执行上面的命令(临时生效);如果想永久生效,执行以下命令(写入 bash 配置文件):
# 永久禁用自动依赖安装(重启终端、重新激活环境也生效)
echo "export MODELSCOPE_AUTO_INSTALL_DEPENDENCY='False'" >> ~/.bashrc
echo "export PIP_NO_INSTALL_UPGRADE=1" >> ~/.bashrc
echo "export PIP_NO_DEPENDENCIES=1" >> ~/.bashrc

# 使配置生效
source ~/.bashrc
步骤 6:准备测试图片和运行脚本(直观版,新手友好)
脚本是核心,之前踩过「输入格式错误」的坑,所以这里直接给大家整理好「可直接运行、输出简洁、容错性强」的脚本,只需修改图片路径和问题即可。
6.1 准备测试图片
将任意一张测试图片(jpg/png 格式均可)放到工作目录下,命名为 test_image.jpg(比如一张瓶子、猫、风景的图片);如果没有本地图片,也可以用在线公开图片 URL(脚本已兼容)。
6.2 创建运行脚本(test.py)
在工作目录下创建 test.py 脚本,复制以下代码(注释清晰,可直接修改):
#!/usr/bin/env python3
# -*- coding: utf-8 -*-
"""
OFA 视觉问答(VQA)模型 运行脚本(直观版,新手友好)
功能:输入本地图片/在线图片 + 英文问题,输出模型推理结果
使用说明:只需修改【核心配置区】的图片路径和问题,无需修改其他代码
"""
import os
import sys
from PIL import Image
import requests
from io import BytesIO
from modelscope.pipelines import pipeline
from modelscope.utils.constant import Tasks

# ======================== 核心配置区(只需改这里,新手重点关注)========================
# 1. 图片来源:二选一(本地路径优先级更高,推荐用本地图片)
LOCAL_IMAGE_PATH = "./test_image.jpg"  # 本地图片路径(工作目录下的图片,如:./cat.jpg、./bottle.png)
# ONLINE_IMAGE_URL = "https://picsum.photos/600/400"  # 备用:公开测试图片URL(无需下载,直接加载)

# 2. 问答问题(⚠️ 注意:该模型仅支持英文提问,中文问题会输出无意义结果)
VQA_QUESTION = "What is the main subject in the picture?"  # 示例1:图片的主要物体是什么?
# VQA_QUESTION = "What color is the object?"  # 示例2:物体是什么颜色?
# VQA_QUESTION = "How many objects are there in the picture?"  # 示例3:图片中有多少个物体?

# ======================== 工具函数(无需修改,封装好的功能)========================
def check_image_exists(path):
    """检查本地图片是否存在,避免路径错误导致加载失败"""
    if not os.path.exists(path):
        print(f"❌ 错误:本地图片文件不存在 → {path}")
        print("请检查图片路径是否正确,或替换为有效的图片文件!")
        sys.exit(1)

def load_image(image_source):
    """加载图片(兼容本地路径和在线URL),返回PIL.Image对象(模型要求的输入格式)"""
    try:
        # 优先加载本地图片
        if os.path.exists(image_source):
            check_image_exists(image_source)
            img = Image.open(image_source).convert('RGB')  # 转为RGB格式,避免灰度图报错
            print(f"✅ 成功加载本地图片 → {image_source}")
        # 加载在线图片(备用,避免本地图片缺失)
        elif image_source.startswith(('http://', 'https://')):
            response = requests.get(image_source, timeout=10)  # 超时时间10秒
            response.raise_for_status()  # 检查URL是否可访问(避免403/404错误)
            img = Image.open(BytesIO(response.content)).convert('RGB')
            print(f"✅ 成功加载在线图片 → {image_source}")
        else:
            raise ValueError("❌ 图片来源错误:必须是本地路径或合法的HTTP/HTTPS URL!")
        return img
    except Exception as e:
        print(f"❌ 图片加载失败:{str(e)}")
        sys.exit(1)

def init_vqa_model():
    """初始化OFA VQA模型管道,核心函数(无需修改)"""
    try:
        # 再次确认禁用自动依赖安装(双重保险,避免环境变量失效)
        os.environ['MODELSCOPE_AUTO_INSTALL_DEPENDENCY'] = 'False'
        os.environ['PIP_NO_INSTALL_UPGRADE'] = '1'

        # 创建VQA模型管道(⚠️ trust_remote_code=True必须加,适配OFA模型的自定义逻辑)
        vqa_pipe = pipeline(
            task=Tasks.visual_question_answering,  # 任务类型:视觉问答
            model='iic/ofa_visual-question-answering_pretrain_large_en',  # 模型名称
            model_revision='v1.0.0',  # 模型版本(固定v1.0.0,避免版本兼容问题)
            trust_remote_code=True  # 关键参数:允许加载模型的自定义代码
        )
        print("✅ OFA VQA模型初始化成功!(首次运行会自动下载模型,耗时稍长,耐心等待)")
        return vqa_pipe
    except Exception as e:
        print(f"❌ 模型初始化失败:{str(e)}")
        sys.exit(1)

# ======================== 主逻辑(无需修改,执行推理)========================
if __name__ == "__main__":
    # 打印标题,直观区分输出
    print("="*60)
    print("📸 OFA 视觉问答(VQA)模型 - 运行工具")
    print("="*60)

    # 1. 初始化OFA VQA模型(首次运行会自动下载模型,约几百MB,耐心等待)
    vqa_model = init_vqa_model()

    # 2. 确定图片来源(优先本地,本地不存在则用在线URL)
    image_source = LOCAL_IMAGE_PATH if os.path.exists(LOCAL_IMAGE_PATH) else globals().get("ONLINE_IMAGE_URL", "")
    if not image_source:
        print("❌ 错误:未配置有效的图片来源!请修改【核心配置区】的图片路径/URL")
        sys.exit(1)

    # 3. 加载图片(转为模型要求的PIL.Image对象)
    img = load_image(image_source)

    # 4. 执行模型推理(核心步骤)
    print(f"\n🤔 提问:{VQA_QUESTION}")
    print("🔍 模型推理中...(推理速度取决于电脑配置,约1-5秒)")
    try:
        # 模型输入格式:(PIL.Image对象, 英文问题文本) → 元组格式(重点!不能用字典)
        result = vqa_model((img, VQA_QUESTION))

        # 简化输出(只提取核心答案,去掉冗余信息,新手更直观)
        answer = result.get("text", ["No answer found"])[0]  # 提取最置信的第一个答案
        print("\n" + "="*60)
        print(f"✅ 推理成功!")
        print(f"📷 图片:{image_source}")
        print(f"🤔 问题:{VQA_QUESTION}")
        print(f"✅ 答案:{answer}")
        print("="*60)

    except Exception as e:
        print(f"\n❌ 推理失败:{type(e).__name__} - {str(e)}")
        sys.exit(1)
步骤 7:运行脚本,查看推理结果
所有准备工作完成后,执行以下命令运行脚本:
python test.py
⚠️ 注意:首次运行脚本时,模型会自动从 ModelScope 下载(约几百MB),耗时稍长,耐心等待即可;后续运行会复用已下载的模型,速度会很快。
运行成功后,输出如下(直观简洁,新手能快速看到结果):
============================================================
📸 OFA 视觉问答(VQA)模型 - 运行工具
============================================================
✅ OFA VQA模型初始化成功!(首次运行会自动下载模型,耗时稍长,耐心等待)
✅ 成功加载本地图片 → ./test_image.jpg

🤔 提问:What is the main subject in the picture?
🔍 模型推理中...(推理速度取决于电脑配置,约1-5秒)

============================================================
✅ 推理成功!
📷 图片:./test_image.jpg
🤔 问题:What is the main subject in the picture?
✅ 答案:a water bottle
============================================================
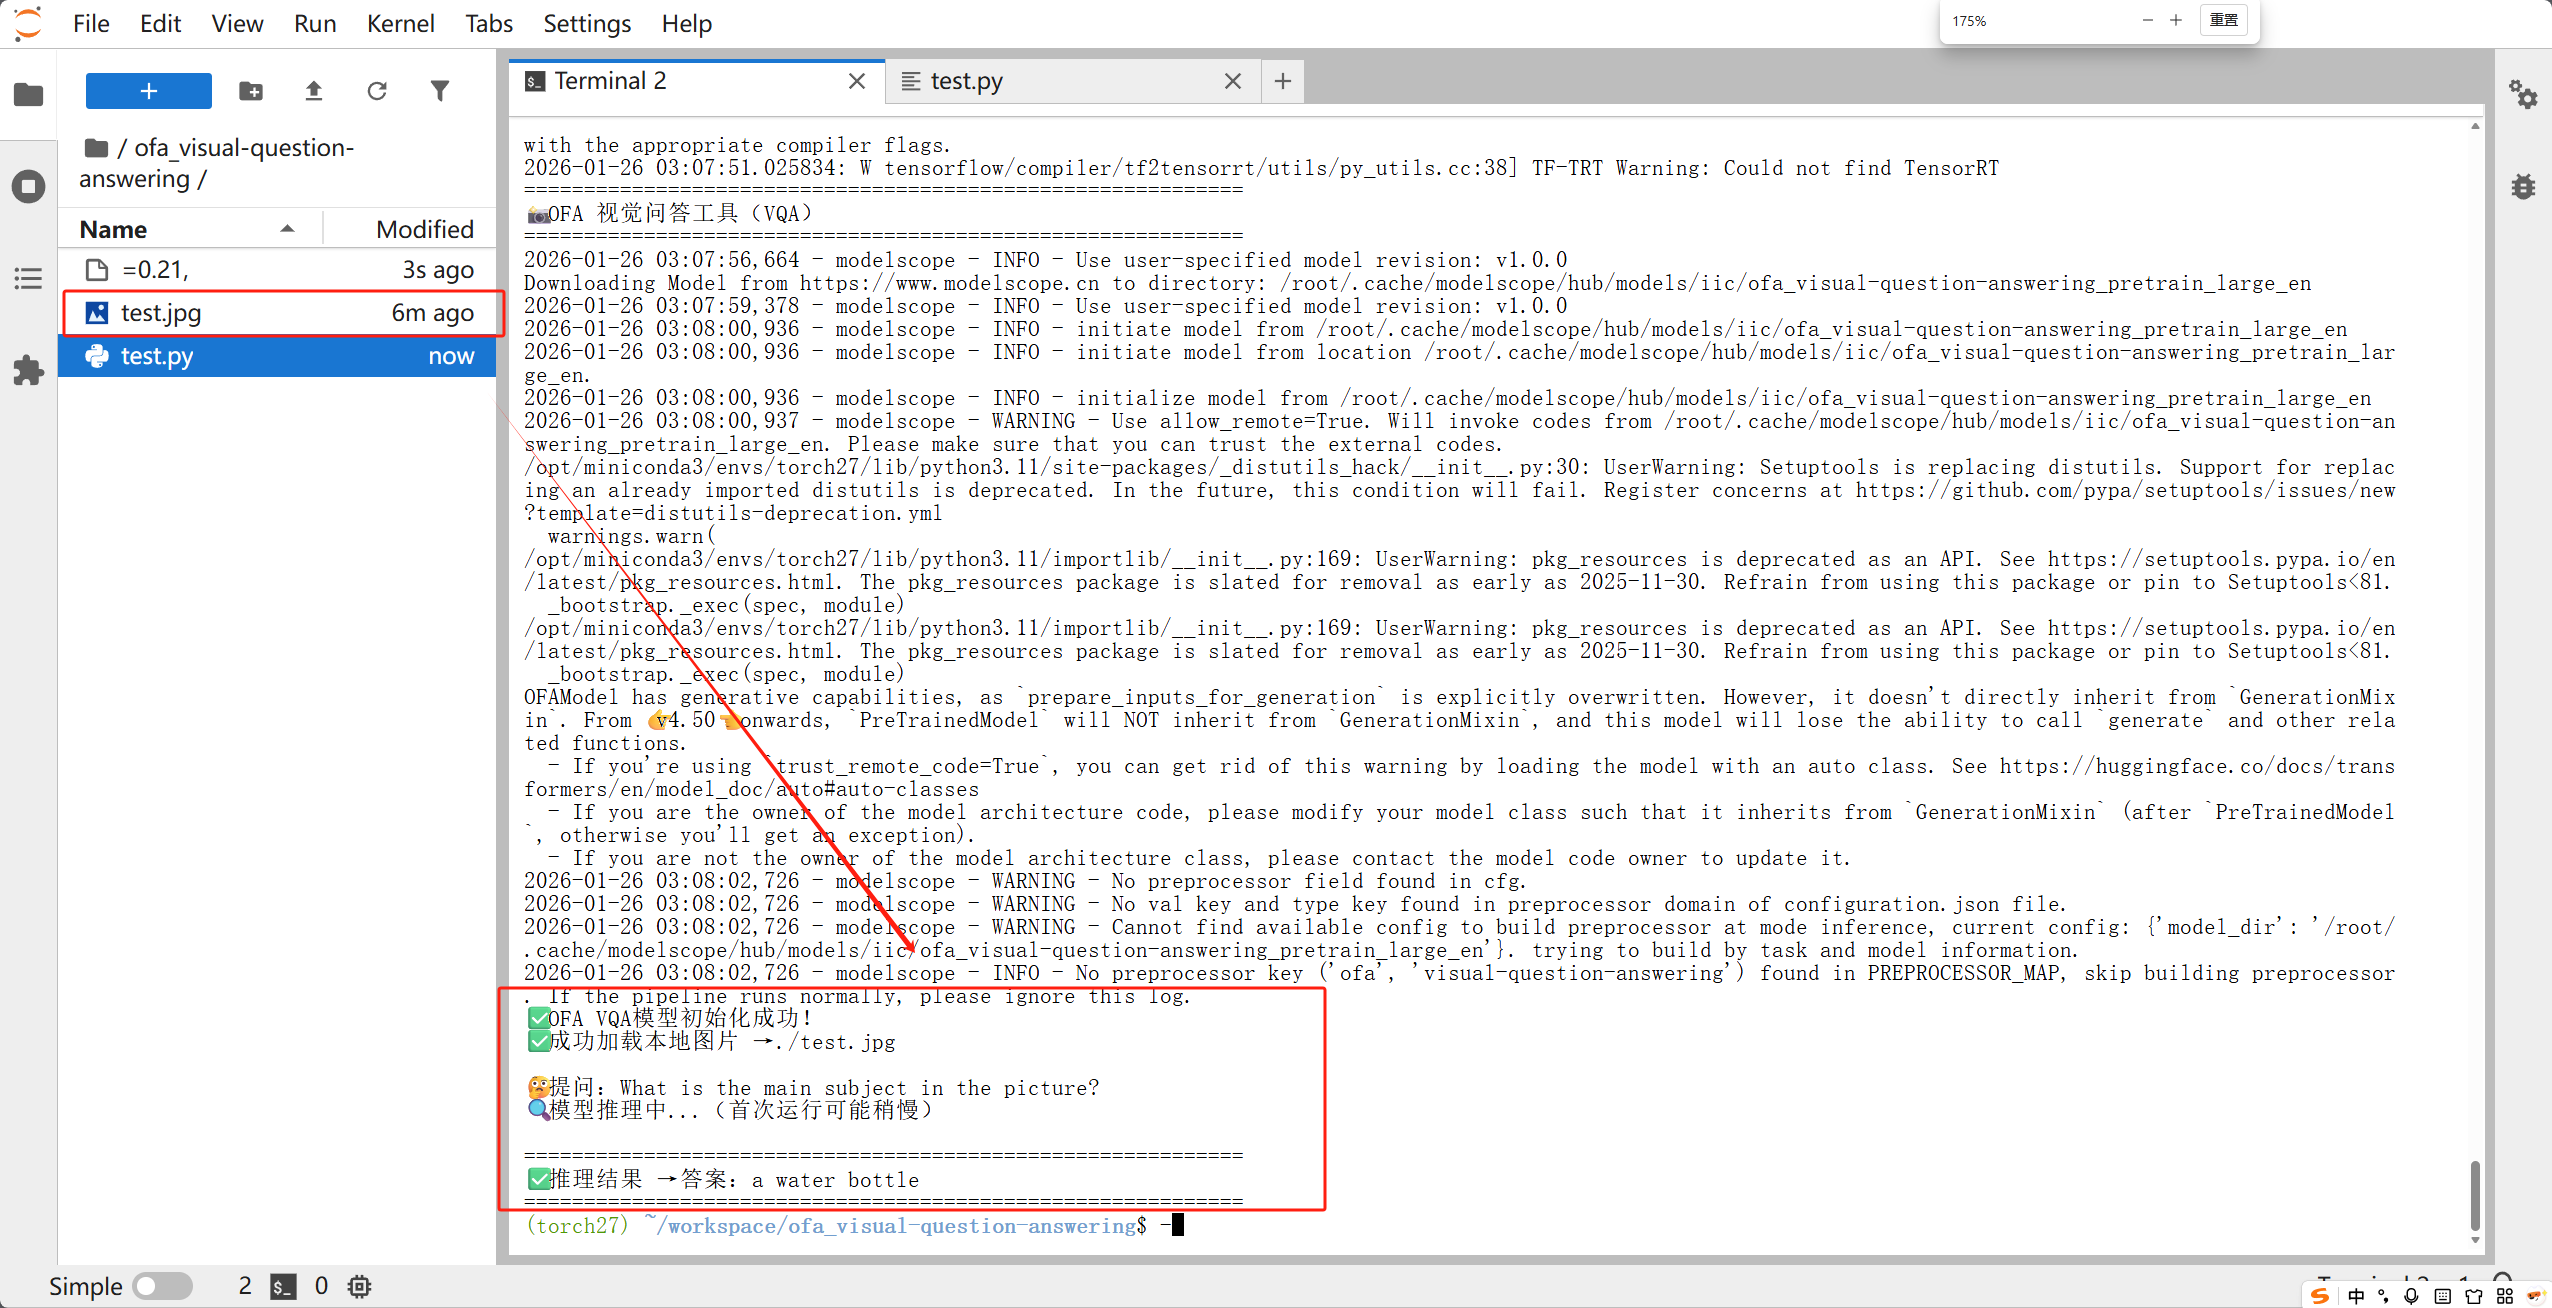
到这里,OFA 视觉问答模型就部署成功并运行啦!
四、部署过程中遇到的所有坑(现象+原因+解决方案)
这部分是重点!我把部署过程中踩过的所有坑都整理出来,每个坑都对应「现象+原因+解决方案」,大家遇到相同问题时,直接对照解决即可,节省时间。
坑1:依赖版本冲突(最常见,踩了3次)
现象1:ImportError: tokenizers>=0.20,<0.21 is required…
ImportError: tokenizers>=0.20,<0.21 is required for a normal functioning of this module, but found tokenizers==0.19.1.
原因:transformers 版本和 tokenizers 版本不匹配(比如 transformers 4.46.1 要求 tokenizers 0.20.x,而安装了 0.19.1)。
解决方案:卸载当前 tokenizers,安装对应版本(比如 transformers 4.46.1 → tokenizers 0.20.1;transformers 4.48.3 → tokenizers 0.21.4),命令:
pip uninstall -y tokenizers
pip install tokenizers==0.21.4  # 对应transformers 4.48.3
现象2:ImportError: cannot import name ‘GGUF_CONFIG_MAPPING’ from ‘transformers.integrations’
ImportError: OfaForAllTasks: cannot import name 'GGUF_CONFIG_MAPPING' from 'transformers.integrations'
原因:transformers 版本过低(比如 4.38.2),该版本的 integrations 模块中没有导出 GGUF_CONFIG_MAPPING,而模型代码引用了这个变量。
解决方案:安装 transformers 4.48.3(ModelScope 硬编码要求,兼容 GGUF_CONFIG_MAPPING),命令:
pip uninstall -y transformers
pip install transformers==4.48.3
现象3:运行脚本时,依赖被自动卸载并重新安装
原因:没有禁用 ModelScope 自动依赖安装,ModelScope 检测到依赖版本和它硬编码的要求不一致,会自动卸载你的版本并强制安装指定版本。
解决方案:设置环境变量,禁用自动依赖安装(参考步骤 5),临时生效或永久生效均可。
坑2:图片加载失败(403 Forbidden 错误)
现象:requests.exceptions.HTTPError: 403 Client Error: Forbidden for url: …
requests.exceptions.HTTPError: 403 Client Error: Forbidden for url: http://modelscope-open.oss-cn-hangzhou.aliyuncs.com/test/images/visual_question_answering.png
原因:使用了 ModelScope 官方的测试图片 URL,该 URL 权限变更或失效,无法访问(403 权限拒绝)。
解决方案:替换为本地图片或公开可访问的在线图片 URL,脚本已兼容两种图片来源(参考步骤 6.1 和 6.2)。
坑3:输入格式错误(‘text’ 相关错误)
现象:运行出错:‘text’ 或 KeyError: ‘text’
原因:模型输入格式不符合要求,OFA VQA 模型要求输入为「(PIL.Image对象, 英文问题文本)」的元组格式,而不是字典(比如 {‘image’: …, ‘question’: …})。
解决方案:按照脚本中的格式,将输入改为元组(PIL.Image对象 + 问题文本),脚本已封装好该逻辑,无需手动修改(参考步骤 6.2 中的主逻辑部分)。
坑4:模型初始化失败(缺少 trust_remote_code=True)
现象:模型初始化时,报错“无法加载自定义代码”或“模型结构不匹配”
原因:OFA 模型有自定义的预处理和推理逻辑,创建 pipeline 时没有添加 trust_remote_code=True 参数,无法加载这些自定义代码。
解决方案:创建 pipeline 时,添加 trust_remote_code=True 参数(参考步骤 6.2 中的 init_vqa_model 函数)。
坑5:警告信息干扰(非错误,可忽略)
现象:运行脚本时,出现以下警告信息
# 警告1:pkg_resources 弃用警告
UserWarning: pkg_resources is deprecated as an API. See ...

# 警告2:TRANSFORMERS_CACHE 弃用警告
FutureWarning: Using `TRANSFORMERS_CACHE` is deprecated and will be removed in v5 of Transformers.

# 警告3:TensorFlow 相关警告(cuDNN、cuFFT 等)
E external/local_xla/xla/stream_executor/cuda/cuda_dnn.cc:9261] Unable to register cuDNN factory: ...
原因:这些都是非功能性警告,不影响模型运行——pkg_resources 弃用是 ModelScope 的依赖问题,TRANSFORMERS_CACHE 弃用是 transformers 的版本提示,TensorFlow 警告是缺少相关插件(不影响 CPU 推理)。
解决方案:直接忽略,无需处理,不影响模型的推理功能。
五、总结与后续优化建议
1. 部署总结
本次 OFA 视觉问答模型部署的核心要点:
- 环境隔离:必须用虚拟环境,避免依赖冲突;
- 版本匹配:transformers4.48.3 + tokenizers0.21.4 + huggingface-hub==0.25.2,版本不能改;
- 禁用自动依赖:设置环境变量,避免 ModelScope 自动覆盖依赖版本;
- 输入格式:必须是(PIL.Image对象, 英文问题)的元组格式;
- 图片来源:避免使用失效的 URL,优先用本地图片。
按照上面的步骤操作,就能成功部署并运行模型,输出正确的视觉问答结果。
2. 后续优化建议
- 永久设置环境变量:将禁用自动依赖的命令写入 ~/.bashrc,避免每次新开终端都要重新执行;
- 支持中文问答:本次使用的是英文模型,可替换为中文 OFA 模型(如
iic/ofa_visual-question-answering_pretrain_large_zh),问题可改为中文; - 优化推理速度:如果电脑有 GPU,可安装 CUDA、PyTorch GPU 版本,推理速度会比 CPU 快 5-10 倍;
- 批量推理:修改脚本,支持批量输入图片和问题,批量输出结果,提高效率。
六、最后
以上就是 OFA 视觉问答模型部署的完整教学,从环境准备到脚本运行,再到避坑指南,每一步都详细标注,新手也能轻松复现。如果大家在部署过程中遇到其他问题,欢迎在评论区留言,我会及时回复~
祝大家部署顺利,早日用上 OFA 模型实现视觉问答功能!🚀
超詳細!OFA 視覺問答(VQA)模型部署教學(避坑完整版)
本文為 ModelScope 英文 OFA VQA 模型 iic/ofa_visual-question-answering_pretrain_large_en 的 Linux(Miniconda)部署全流程:覆蓋清華鏡像、transformers/tokenizers/huggingface-hub 固定版本組合,以及通過環境變量禁用 ModelScope 自動改依賴的關鍵步驟。文中給出可直接運行的 test.py(本地圖或 HTTPS URL + 英文問題,輸入為元組格式),並整理了依賴衝突、403 測試圖、trust_remote_code、tuple 輸入與各類告警等常見問題對照表。
來源:https://blog.csdn.net/2403_87969572/article/details/157376107
抓取時間(ISO本地):2026-05-18 05:17:35
前言
大家好~ 最近嘗試部署 OFA 視覺問答(VQA)模型,過程中踩了無數個依賴版本、輸入格式、許可權相關的坑,耗時很久才成功執行並輸出正確結果。為了避免大家重複踩坑,今天整理了一份完整、可復現的部署教學,從環境準備到指令碼執行,每一步都標清細節,連遇到的坑都附帶「現象+原因+解決方案」,新手也能輕鬆上手!
一、前言:什麼是 OFA VQA 模型?
OFA(One For All)是位元組跳動提出的多模態預訓練模型,支援視覺問答、影象描述、影象編輯等多種任務,其中視覺問答(VQA)是最常用的功能之一——輸入一張圖片和一個英文問題(該模型僅支援英文),模型就能輸出對應的答案(比如輸入“瓶子”圖片+問題“What is the main subject?”,輸出“a water bottle”)。
本次部署使用 ModelScope 平臺的 iic/ofa_visual-question-answering_pretrain_large_en 模型,基於 Python 虛擬環境(Miniconda)部署,全程在 Linux 環境下操作(Windows 可參考,命令略有差異)。
二、前置準備
1. 環境基礎
- 系統:Linux(Ubuntu/CentOS 均可,本次用 Ubuntu)
- 工具:Miniconda(用於建立獨立虛擬環境,避免環境汙染)
- Python 版本:3.11(親測相容,3.9-3.11 均可,不建議 3.12+,部分依賴不支援)
- 網路:能訪問 ModelScope、PyPI 源(建議換清華源,提速)
2. 提前說明
本次部署的核心難點的是「依賴版本匹配」——ModelScope 平臺的 OFA 模型會硬編碼依賴版本,執行時會自動解除安裝你安裝的版本並強制安裝指定版本,很容易導致版本衝突;其次是「輸入格式適配」和「圖片載入許可權」問題,這兩個坑也很容易卡殼,後面會詳細說明。
三、完整部署步驟(一步都不能少)
步驟 1:建立並啟用虛擬環境(關鍵!避免環境汙染)
為什麼要建立虛擬環境?因為不同模型的依賴版本差異很大,比如本次 OFA 模型對 transformers、tokenizers 的版本要求很嚴格,和其他模型可能衝突,獨立虛擬環境能隔離這些差異。
開啟終端,執行以下命令(全程複製即可):
# 1. 啟用 Miniconda(如果沒配置環境變數,先執行這個,具體路徑根據自己的 Miniconda 安裝位置修改)
source /opt/miniconda3/bin/activate

# 2. 建立虛擬環境(環境名:torch27,Python 版本 3.11,可自定義環境名)
conda create -n torch27 python=3.11 -y

# 3. 啟用建立好的虛擬環境(後續所有操作都要在這個環境裡執行)
conda activate torch27
執行成功後,終端字首會顯示 (torch27),說明已經進入虛擬環境。
步驟 2:配置清華 PyPI 源(提速,避免下載依賴超時)
預設 PyPI 源在國外,下載依賴很慢,甚至會超時,建議配置清華源,執行以下命令:
pip config set global.index-url https://pypi.tuna.tsinghua.edu.cn/simple
配置成功後,後續用 pip 安裝依賴會自動走清華源,速度翻倍。
步驟 3:建立工作目錄,下載模型相關檔案
建立一個單獨的工作目錄,用於存放指令碼、圖片等檔案,避免檔案混亂:
# 1. 建立工作目錄(路徑可自定義,本次用 /root/workspace/ofa_visual-question-answering)
mkdir -p /root/workspace/ofa_visual-question-answering

# 2. 進入工作目錄(後續所有操作都在這個目錄下)
cd /root/workspace/ofa_visual-question-answering
步驟 4:安裝核心依賴(重點!版本必須完全匹配)
這是部署過程中最容易踩坑的一步!OFA 模型對依賴版本要求極高,尤其是 transformers、tokenizers、huggingface-hub 這三個庫,版本不匹配會直接導致模型無法初始化,甚至報錯。
先給大家上「最終可用的依賴版本組合」(親測可復現,避免踩坑):
- tensorboardX==2.6.4(模型日誌相關,版本可相容)
- huggingface-hub==0.25.2(ModelScope 硬編碼要求,不能高也不能低)
- transformers==4.48.3(ModelScope 硬編碼要求,對應 tokenizers 0.21.4)
- tokenizers==0.21.4(必須和 transformers 4.48.3 匹配,否則報錯)
- modelscope(模型載入平臺,直接安裝最新版即可)
- Pillow、requests(圖片載入相關,必備)
執行以下命令,一次性安裝所有依賴(順序不要亂,避免版本衝突):
# 1. 先安裝 tensorboardX(無版本衝突,放心裝)
pip install tensorboardX==2.6.4

# 2. 安裝 ModelScope 硬編碼要求的核心依賴(重點!版本不能改)
pip install huggingface-hub==0.25.2 tokenizers==0.21.4 transformers==4.48.3

# 3. 安裝 modelscope(最新版即可,負責載入 OFA 模型)
pip install modelscope

# 4. 安裝圖片載入相關依賴(Pillow 處理本地圖片,requests 處理線上圖片)
pip install Pillow requests
安裝過程中如果出現「WARNING: Running pip as the ‘root’ user」警告,可忽略,不影響功能(這是提示用 root 使用者執行 pip 可能有許可權問題,但不影響模型部署)。
安裝完成後,驗證一下版本是否正確(避免安裝出錯):
python -c "import transformers, tokenizers, huggingface_hub; print(f'transformers: {transformers.__version__}'); print(f'tokenizers: {tokenizers.__version__}'); print(f'huggingface-hub: {huggingface_hub.__version__}')"
正常輸出如下(版本必須完全一致):
transformers: 4.48.3
tokenizers: 0.21.4
huggingface-hub: 0.25.2
如果輸出的版本不一致,重新執行步驟 4 的安裝命令,確保版本正確。
步驟 5:禁用 ModelScope 自動依賴安裝(核心避坑操作)
這是最關鍵的避坑步驟!ModelScope 載入 OFA 模型時,會自動檢查依賴版本,如果發現版本和它硬編碼的要求不一致,會直接解除安裝你的版本並強制安裝指定版本——哪怕你已經安裝了正確的版本,也會被覆蓋,導致之前的努力白費。
所以,我們需要設定環境變數,禁用 ModelScope 自動安裝/升級依賴,執行以下命令:
# 禁用 ModelScope 自動安裝依賴(臨時生效,僅當前終端會話)
export MODELSCOPE_AUTO_INSTALL_DEPENDENCY='False'
export PIP_NO_INSTALL_UPGRADE=1
export PIP_NO_DEPENDENCIES=1
⚠️ 注意:如果後續新開終端、重新啟用虛擬環境,需要重新執行上面的命令(臨時生效);如果想永久生效,執行以下命令(寫入 bash 配置檔案):
# 永久禁用自動依賴安裝(重啟終端、重新啟用環境也生效)
echo "export MODELSCOPE_AUTO_INSTALL_DEPENDENCY='False'" >> ~/.bashrc
echo "export PIP_NO_INSTALL_UPGRADE=1" >> ~/.bashrc
echo "export PIP_NO_DEPENDENCIES=1" >> ~/.bashrc

# 使配置生效
source ~/.bashrc
步驟 6:準備測試圖片和執行指令碼(直觀版,新手友好)
指令碼是核心,之前踩過「輸入格式錯誤」的坑,所以這裡直接給大家整理好「可直接執行、輸出簡潔、容錯性強」的指令碼,只需修改圖片路徑和問題即可。
6.1 準備測試圖片
將任意一張測試圖片(jpg/png 格式均可)放到工作目錄下,命名為 test_image.jpg(比如一張瓶子、貓、風景的圖片);如果沒有本地圖片,也可以用線上公開圖片 URL(指令碼已相容)。
6.2 建立執行指令碼(test.py)
在工作目錄下建立 test.py 指令碼,複製以下程式碼(註釋清晰,可直接修改):
#!/usr/bin/env python3
# -*- coding: utf-8 -*-
"""
OFA 視覺問答(VQA)模型 執行指令碼(直觀版,新手友好)
功能:輸入本地圖片/線上圖片 + 英文問題,輸出模型推理結果
使用說明:只需修改【核心配置區】的圖片路徑和問題,無需修改其他程式碼
"""
import os
import sys
from PIL import Image
import requests
from io import BytesIO
from modelscope.pipelines import pipeline
from modelscope.utils.constant import Tasks

# ======================== 核心配置區(只需改這裡,新手重點關注)========================
# 1. 圖片來源:二選一(本地路徑優先順序更高,推薦用本地圖片)
LOCAL_IMAGE_PATH = "./test_image.jpg"  # 本地圖片路徑(工作目錄下的圖片,如:./cat.jpg、./bottle.png)
# ONLINE_IMAGE_URL = "https://picsum.photos/600/400"  # 備用:公開測試圖片URL(無需下載,直接載入)

# 2. 問答問題(⚠️ 注意:該模型僅支援英文提問,中文問題會輸出無意義結果)
VQA_QUESTION = "What is the main subject in the picture?"  # 示例1:圖片的主要物體是什麼?
# VQA_QUESTION = "What color is the object?"  # 示例2:物體是什麼顏色?
# VQA_QUESTION = "How many objects are there in the picture?"  # 示例3:圖片中有多少個物體?

# ======================== 工具函式(無需修改,封裝好的功能)========================
def check_image_exists(path):
    """檢查本地圖片是否存在,避免路徑錯誤導致載入失敗"""
    if not os.path.exists(path):
        print(f"❌ 錯誤:本地圖片檔案不存在 → {path}")
        print("請檢查圖片路徑是否正確,或替換為有效的圖片檔案!")
        sys.exit(1)

def load_image(image_source):
    """載入圖片(相容本地路徑和線上URL),返回PIL.Image物件(模型要求的輸入格式)"""
    try:
        # 優先載入本地圖片
        if os.path.exists(image_source):
            check_image_exists(image_source)
            img = Image.open(image_source).convert('RGB')  # 轉為RGB格式,避免灰度圖報錯
            print(f"✅ 成功載入本地圖片 → {image_source}")
        # 載入線上圖片(備用,避免本地圖片缺失)
        elif image_source.startswith(('http://', 'https://')):
            response = requests.get(image_source, timeout=10)  # 超時時間10秒
            response.raise_for_status()  # 檢查URL是否可訪問(避免403/404錯誤)
            img = Image.open(BytesIO(response.content)).convert('RGB')
            print(f"✅ 成功載入線上圖片 → {image_source}")
        else:
            raise ValueError("❌ 圖片來源錯誤:必須是本地路徑或合法的HTTP/HTTPS URL!")
        return img
    except Exception as e:
        print(f"❌ 圖片載入失敗:{str(e)}")
        sys.exit(1)

def init_vqa_model():
    """初始化OFA VQA模型管道,核心函式(無需修改)"""
    try:
        # 再次確認禁用自動依賴安裝(雙重保險,避免環境變數失效)
        os.environ['MODELSCOPE_AUTO_INSTALL_DEPENDENCY'] = 'False'
        os.environ['PIP_NO_INSTALL_UPGRADE'] = '1'

        # 建立VQA模型管道(⚠️ trust_remote_code=True必須加,適配OFA模型的自定義邏輯)
        vqa_pipe = pipeline(
            task=Tasks.visual_question_answering,  # 任務型別:視覺問答
            model='iic/ofa_visual-question-answering_pretrain_large_en',  # 模型名稱
            model_revision='v1.0.0',  # 模型版本(固定v1.0.0,避免版本相容問題)
            trust_remote_code=True  # 關鍵引數:允許載入模型的自定義程式碼
        )
        print("✅ OFA VQA模型初始化成功!(首次執行會自動下載模型,耗時稍長,耐心等待)")
        return vqa_pipe
    except Exception as e:
        print(f"❌ 模型初始化失敗:{str(e)}")
        sys.exit(1)

# ======================== 主邏輯(無需修改,執行推理)========================
if __name__ == "__main__":
    # 列印標題,直觀區分輸出
    print("="*60)
    print("📸 OFA 視覺問答(VQA)模型 - 執行工具")
    print("="*60)

    # 1. 初始化OFA VQA模型(首次執行會自動下載模型,約幾百MB,耐心等待)
    vqa_model = init_vqa_model()

    # 2. 確定圖片來源(優先本地,本地不存在則用線上URL)
    image_source = LOCAL_IMAGE_PATH if os.path.exists(LOCAL_IMAGE_PATH) else globals().get("ONLINE_IMAGE_URL", "")
    if not image_source:
        print("❌ 錯誤:未配置有效的圖片來源!請修改【核心配置區】的圖片路徑/URL")
        sys.exit(1)

    # 3. 載入圖片(轉為模型要求的PIL.Image物件)
    img = load_image(image_source)

    # 4. 執行模型推理(核心步驟)
    print(f"\n🤔 提問:{VQA_QUESTION}")
    print("🔍 模型推理中...(推理速度取決於電腦配置,約1-5秒)")
    try:
        # 模型輸入格式:(PIL.Image物件, 英文問題文字) → 元組格式(重點!不能用字典)
        result = vqa_model((img, VQA_QUESTION))

        # 簡化輸出(只提取核心答案,去掉冗餘資訊,新手更直觀)
        answer = result.get("text", ["No answer found"])[0]  # 提取最置信的第一個答案
        print("\n" + "="*60)
        print(f"✅ 推理成功!")
        print(f"📷 圖片:{image_source}")
        print(f"🤔 問題:{VQA_QUESTION}")
        print(f"✅ 答案:{answer}")
        print("="*60)

    except Exception as e:
        print(f"\n❌ 推理失敗:{type(e).__name__} - {str(e)}")
        sys.exit(1)
步驟 7:執行指令碼,檢視推理結果
所有準備工作完成後,執行以下命令執行指令碼:
python test.py
⚠️ 注意:首次執行指令碼時,模型會自動從 ModelScope 下載(約幾百MB),耗時稍長,耐心等待即可;後續執行會複用已下載的模型,速度會很快。
執行成功後,輸出如下(直觀簡潔,新手能快速看到結果):
============================================================
📸 OFA 視覺問答(VQA)模型 - 執行工具
============================================================
✅ OFA VQA模型初始化成功!(首次執行會自動下載模型,耗時稍長,耐心等待)
✅ 成功載入本地圖片 → ./test_image.jpg

🤔 提問:What is the main subject in the picture?
🔍 模型推理中...(推理速度取決於電腦配置,約1-5秒)

============================================================
✅ 推理成功!
📷 圖片:./test_image.jpg
🤔 問題:What is the main subject in the picture?
✅ 答案:a water bottle
============================================================
到這裡,OFA 視覺問答模型就部署成功並執行啦!
四、部署過程中遇到的所有坑(現象+原因+解決方案)
這部分是重點!我把部署過程中踩過的所有坑都整理出來,每個坑都對應「現象+原因+解決方案」,大家遇到相同問題時,直接對照解決即可,節省時間。
坑1:依賴版本衝突(最常見,踩了3次)
現象1:ImportError: tokenizers>=0.20,<0.21 is required…
ImportError: tokenizers>=0.20,<0.21 is required for a normal functioning of this module, but found tokenizers==0.19.1.
原因:transformers 版本和 tokenizers 版本不匹配(比如 transformers 4.46.1 要求 tokenizers 0.20.x,而安裝了 0.19.1)。
解決方案:解除安裝當前 tokenizers,安裝對應版本(比如 transformers 4.46.1 → tokenizers 0.20.1;transformers 4.48.3 → tokenizers 0.21.4),命令:
pip uninstall -y tokenizers
pip install tokenizers==0.21.4  # 對應transformers 4.48.3
現象2:ImportError: cannot import name ‘GGUF_CONFIG_MAPPING’ from ‘transformers.integrations’
ImportError: OfaForAllTasks: cannot import name 'GGUF_CONFIG_MAPPING' from 'transformers.integrations'
原因:transformers 版本過低(比如 4.38.2),該版本的 integrations 模組中沒有匯出 GGUF_CONFIG_MAPPING,而模型程式碼引用了這個變數。
解決方案:安裝 transformers 4.48.3(ModelScope 硬編碼要求,相容 GGUF_CONFIG_MAPPING),命令:
pip uninstall -y transformers
pip install transformers==4.48.3
現象3:執行指令碼時,依賴被自動解除安裝並重新安裝
原因:沒有禁用 ModelScope 自動依賴安裝,ModelScope 檢測到依賴版本和它硬編碼的要求不一致,會自動解除安裝你的版本並強制安裝指定版本。
解決方案:設定環境變數,禁用自動依賴安裝(參考步驟 5),臨時生效或永久生效均可。
坑2:圖片載入失敗(403 Forbidden 錯誤)
現象:requests.exceptions.HTTPError: 403 Client Error: Forbidden for url: …
requests.exceptions.HTTPError: 403 Client Error: Forbidden for url: http://modelscope-open.oss-cn-hangzhou.aliyuncs.com/test/images/visual_question_answering.png
原因:使用了 ModelScope 官方的測試圖片 URL,該 URL 許可權變更或失效,無法訪問(403 許可權拒絕)。
解決方案:替換為本地圖片或公開可訪問的線上圖片 URL,指令碼已相容兩種圖片來源(參考步驟 6.1 和 6.2)。
坑3:輸入格式錯誤(‘text’ 相關錯誤)
現象:執行出錯:‘text’ 或 KeyError: ‘text’
原因:模型輸入格式不符合要求,OFA VQA 模型要求輸入為「(PIL.Image物件, 英文問題文字)」的元組格式,而不是字典(比如 {‘image’: …, ‘question’: …})。
解決方案:按照指令碼中的格式,將輸入改為元組(PIL.Image物件 + 問題文字),指令碼已封裝好該邏輯,無需手動修改(參考步驟 6.2 中的主邏輯部分)。
坑4:模型初始化失敗(缺少 trust_remote_code=True)
現象:模型初始化時,報錯“無法載入自定義程式碼”或“模型結構不匹配”
原因:OFA 模型有自定義的預處理和推理邏輯,建立 pipeline 時沒有新增 trust_remote_code=True 引數,無法載入這些自定義程式碼。
解決方案:建立 pipeline 時,新增 trust_remote_code=True 引數(參考步驟 6.2 中的 init_vqa_model 函式)。
坑5:警告資訊干擾(非錯誤,可忽略)
現象:執行指令碼時,出現以下警告資訊
# 警告1:pkg_resources 棄用警告
UserWarning: pkg_resources is deprecated as an API. See ...

# 警告2:TRANSFORMERS_CACHE 棄用警告
FutureWarning: Using `TRANSFORMERS_CACHE` is deprecated and will be removed in v5 of Transformers.

# 警告3:TensorFlow 相關警告(cuDNN、cuFFT 等)
E external/local_xla/xla/stream_executor/cuda/cuda_dnn.cc:9261] Unable to register cuDNN factory: ...
原因:這些都是非功能性警告,不影響模型執行——pkg_resources 棄用是 ModelScope 的依賴問題,TRANSFORMERS_CACHE 棄用是 transformers 的版本提示,TensorFlow 警告是缺少相關外掛(不影響 CPU 推理)。
解決方案:直接忽略,無需處理,不影響模型的推理功能。
五、總結與後續最佳化建議
1. 部署總結
本次 OFA 視覺問答模型部署的核心要點:
- 環境隔離:必須用虛擬環境,避免依賴衝突;
- 版本匹配:transformers4.48.3 + tokenizers0.21.4 + huggingface-hub==0.25.2,版本不能改;
- 禁用自動依賴:設定環境變數,避免 ModelScope 自動覆蓋依賴版本;
- 輸入格式:必須是(PIL.Image物件, 英文問題)的元組格式;
- 圖片來源:避免使用失效的 URL,優先用本地圖片。
按照上面的步驟操作,就能成功部署並執行模型,輸出正確的視覺問答結果。
2. 後續最佳化建議
- 永久設定環境變數:將禁用自動依賴的命令寫入 ~/.bashrc,避免每次新開終端都要重新執行;
- 支援中文問答:本次使用的是英文模型,可替換為中文 OFA 模型(如
iic/ofa_visual-question-answering_pretrain_large_zh),問題可改為中文; - 最佳化推理速度:如果電腦有 GPU,可安裝 CUDA、PyTorch GPU 版本,推理速度會比 CPU 快 5-10 倍;
- 批次推理:修改指令碼,支援批次輸入圖片和問題,批次輸出結果,提高效率。
六、最後
以上就是 OFA 視覺問答模型部署的完整教學,從環境準備到指令碼執行,再到避坑指南,每一步都詳細標註,新手也能輕鬆復現。如果大家在部署過程中遇到其他問題,歡迎在評論區留言,我會及時回覆~
祝大家部署順利,早日用上 OFA 模型實現視覺問答功能!🚀
Deep Dive: Deploying the OFA Visual Question Answering (VQA) Model (Complete Pitfall Guide)
Hi everyone — I recently deployed the OFA VQA model and hit countless pitfalls around dependency versions, input formats, and permissions; it took a long time before inference produced correct answers. To save you the same pain, here is a fully reproducible walkthrough from environment prep through running scripts. Each step calls out details, and every pitfall includes symptom → cause → fix so newcomers can follow confidently.
Captured at (ISO local): 2026-05-18 05:17:35
Preface
Hi everyone — I recently deployed the OFA VQA model and hit countless pitfalls around dependency versions, input formats, and permissions; it took a long time before inference produced correct answers. To save you the same pain, here is a fully reproducible walkthrough from environment prep through running scripts. Each step calls out details, and every pitfall includes symptom → cause → fix so newcomers can follow confidently.
I. Background: What is the OFA VQA model?
OFA (One For All) is a multimodal pretrained model from ByteDance. It supports VQA, captioning, image editing, and more. Visual Question Answering (VQA) is one of the most common flows: feed one image + one English question (this checkpoint is English-only) and read back a short answer (e.g., bottle photo + “What is the main subject?” → “a water bottle”).
This guide uses ModelScope model iic/ofa_visual-question-answering_pretrain_large_en, Python inside Miniconda, on Linux (Windows is similar with adjusted commands).
II. Prerequisites
1. Baseline environment
- OS: Linux (Ubuntu/CentOS; examples use Ubuntu)
- Tooling: Miniconda for isolated envs
- Python: 3.11 tested (3.9–3.11 OK; avoid 3.12+ where deps lag)
- Network: Reach ModelScope + PyPI (Tsinghua mirror recommended)
2. Heads-up
Hardest parts: pin-matching dependencies — ModelScope may hard-pin versions and reinstall packages at runtime — plus input formatting and image loading permissions. All covered below.
III. Full deployment path (follow in order)
Step 1: Create & activate a virtual env
Why isolate? Different models want incompatible transformers / tokenizers stacks.
# 1. Activate Miniconda (adjust path if needed)
source /opt/miniconda3/bin/activate

# 2. Create env torch27 with Python 3.11 (name is arbitrary)
conda create -n torch27 python=3.11 -y

# 3. Activate — stay in this env for everything below
conda activate torch27
Success shows (torch27) in your shell prompt.
Step 2: Tsinghua PyPI mirror
pip config set global.index-url https://pypi.tuna.tsinghua.edu.cn/simple
Step 3: Working folder + layout
mkdir -p /root/workspace/ofa_visual-question-answering
cd /root/workspace/ofa_visual-question-answering
Step 4: Install pinned deps (critical)
Known-good combo:
- tensorboardX==2.6.4
- huggingface-hub==0.25.2 (hard requirement)
- transformers==4.48.3 (hard requirement)
- tokenizers==0.21.4 (pairs with transformers 4.48.3)
- modelscope (latest ok)
- Pillow, requests
Install in order:
pip install tensorboardX==2.6.4

pip install huggingface-hub==0.25.2 tokenizers==0.21.4 transformers==4.48.3

pip install modelscope

pip install Pillow requests
Ignore benign root-user pip warnings.
Verify versions:
python -c "import transformers, tokenizers, huggingface_hub; print(f'transformers: {transformers.__version__}'); print(f'tokenizers: {tokenizers.__version__}'); print(f'huggingface-hub: {huggingface_hub.__version__}')"
Expect exactly:
transformers: 4.48.3
tokenizers: 0.21.4
huggingface-hub: 0.25.2
If mismatch, reinstall Step 4.
Step 5: Disable ModelScope auto dependency churn (must-do)
ModelScope may uninstall your pins unless you opt out:
export MODELSCOPE_AUTO_INSTALL_DEPENDENCY='False'
export PIP_NO_INSTALL_UPGRADE=1
export PIP_NO_DEPENDENCIES=1
⚠️ New shells need this again unless persisted:
echo "export MODELSCOPE_AUTO_INSTALL_DEPENDENCY='False'" >> ~/.bashrc
echo "export PIP_NO_INSTALL_UPGRADE=1" >> ~/.bashrc
echo "export PIP_NO_DEPENDENCIES=1" >> ~/.bashrc
source ~/.bashrc
Step 6: Test image + test.py
6.1 Image
Place any JPG/PNG as test_image.jpg in the working folder, or rely on a public HTTPS URL (script supports both).
6.2 test.py
#!/usr/bin/env python3
# -*- coding: utf-8 -*-
"""
OFA VQA runnable starter script.
Inputs: local path or HTTPS image + English question.
Outputs: concise answer text.
"""
import os
import sys
from PIL import Image
import requests
from io import BytesIO
from modelscope.pipelines import pipeline
from modelscope.utils.constant import Tasks

# ======================== Config (edit here only) ========================
LOCAL_IMAGE_PATH = "./test_image.jpg"
# ONLINE_IMAGE_URL = "https://picsum.photos/600/400"

# English questions only — Chinese yields nonsense with this checkpoint
VQA_QUESTION = "What is the main subject in the picture?"
# VQA_QUESTION = "What color is the object?"
# VQA_QUESTION = "How many objects are there in the picture?"

# ======================== Helpers ========================
def check_image_exists(path):
    if not os.path.exists(path):
        print(f"ERROR: missing image file → {path}")
        print("Fix the path or add a valid image.")
        sys.exit(1)

def load_image(image_source):
    try:
        if os.path.exists(image_source):
            check_image_exists(image_source)
            img = Image.open(image_source).convert('RGB')
            print(f"OK loaded local image → {image_source}")
        elif image_source.startswith(('http://', 'https://')):
            response = requests.get(image_source, timeout=10)
            response.raise_for_status()
            img = Image.open(BytesIO(response.content)).convert('RGB')
            print(f"OK loaded remote image → {image_source}")
        else:
            raise ValueError("ERROR: image_source must be local path or http(s) URL")
        return img
    except Exception as e:
        print(f"ERROR loading image: {str(e)}")
        sys.exit(1)

def init_vqa_model():
    try:
        os.environ['MODELSCOPE_AUTO_INSTALL_DEPENDENCY'] = 'False'
        os.environ['PIP_NO_INSTALL_UPGRADE'] = '1'

        vqa_pipe = pipeline(
            task=Tasks.visual_question_answering,
            model='iic/ofa_visual-question-answering_pretrain_large_en',
            model_revision='v1.0.0',
            trust_remote_code=True
        )
        print("OK OFA VQA pipeline ready (first run downloads weights — wait)")
        return vqa_pipe
    except Exception as e:
        print(f"ERROR initializing model: {str(e)}")
        sys.exit(1)

# ======================== Main ========================
if __name__ == "__main__":
    print("="*60)
    print("OFA Visual Question Answering — runner")
    print("="*60)

    vqa_model = init_vqa_model()

    image_source = LOCAL_IMAGE_PATH if os.path.exists(LOCAL_IMAGE_PATH) else globals().get("ONLINE_IMAGE_URL", "")
    if not image_source:
        print("ERROR: configure LOCAL_IMAGE_PATH or ONLINE_IMAGE_URL")
        sys.exit(1)

    img = load_image(image_source)

    print(f"\nQuestion: {VQA_QUESTION}")
    print("Running inference...")
    try:
        result = vqa_model((img, VQA_QUESTION))

        answer = result.get("text", ["No answer found"])[0]
        print("\n" + "="*60)
        print(f"Inference OK")
        print(f"Image: {image_source}")
        print(f"Question: {VQA_QUESTION}")
        print(f"Answer: {answer}")
        print("="*60)

    except Exception as e:
        print(f"\nERROR inference: {type(e).__name__} - {str(e)}")
        sys.exit(1)
Step 7: Run
python test.py
First run downloads hundreds of MB from ModelScope — normal.
Example success log:
============================================================
OFA Visual Question Answering — runner
============================================================
OK OFA VQA pipeline ready (first run downloads weights — wait)
OK loaded local image → ./test_image.jpg

Question: What is the main subject in the picture?
Running inference...

============================================================
Inference OK
Image: ./test_image.jpg
Question: What is the main subject in the picture?
Answer: a water bottle
============================================================
You’re deployed.
IV. Pitfalls we hit (symptom → cause → fix)
Pitfall 1: Version drift (most common)
Symptom A: ImportError: tokenizers>=0.20,<0.21 is required…
ImportError: tokenizers>=0.20,<0.21 is required for a normal functioning of this module, but found tokenizers==0.19.1.
Cause: transformers / tokenizers mismatch.
Fix:
pip uninstall -y tokenizers
pip install tokenizers==0.21.4
Symptom B: GGUF_CONFIG_MAPPING import failure
ImportError: OfaForAllTasks: cannot import name 'GGUF_CONFIG_MAPPING' from 'transformers.integrations'
Cause: transformers too old.
Fix:
pip uninstall -y transformers
pip install transformers==4.48.3
Symptom C: packages silently reinstalled mid-run
Cause: ModelScope dependency automation still enabled.
Fix: Apply Step 5 env vars.
Pitfall 2: Remote image 403
Symptom: requests.exceptions.HTTPError: 403 Client Error
requests.exceptions.HTTPError: 403 Client Error: Forbidden for url: http://modelscope-open.oss-cn-hangzhou.aliyuncs.com/test/images/visual_question_answering.png
Cause: Official sample URL permission drift.
Fix: Local file or another reachable HTTPS URL.
Pitfall 3: Wrong input container type
Symptom: 'text' / KeyError: 'text'
Cause: OFA expects tuple (PIL.Image, question_str), not dict payloads.
Fix: Follow script wiring above.
Pitfall 4: Missing trust_remote_code=True
Symptom: custom-code load failures / architecture mismatch hints.
Cause: Remote preprocessing logic blocked.
Fix: Pass trust_remote_code=True in pipeline(...).
Pitfall 5: Noisy warnings (safe to ignore)
Symptom: pkg_resources deprecation, TRANSFORMERS_CACHE FutureWarning, TensorFlow CUDA chatter.
Cause: upstream deprecation / optional accel stacks absent.
Fix: Ignore if inference succeeds.
V. Wrap-up & next steps
Takeaways
- Virtual env isolation
- Pin trio: transformers 4.48.3 + tokenizers 0.21.4 + huggingface-hub 0.25.2
- Disable ModelScope auto dependency churn
- Tuple input
(image, English question) - Prefer local images over flaky URLs
Ideas beyond this guide
- Persist env exports in
~/.bashrc - Swap Chinese checkpoint
iic/ofa_visual-question-answering_pretrain_large_zhif you need Chinese QA - Install CUDA PyTorch for 5–10× GPU speedups
- Batch loops over
(path, question)pairs for throughput
VI. Closing
That’s the full OFA VQA deployment story — environment, pins, runnable script, and field notes on failures. If you hit something else, drop a comment and we can iterate.
Happy shipping — enjoy multimodal QA with OFA!