深度学习降噪利器:手把手教你三分钟部署 FRCRN 单麦语音降噪程序
三分钟部署阿里达摩院FRCRN 16k单麦降噪:ModelScope pipeline快速验证,FastAPI封装Web API,强调采样率16k、GPU/CPU与长音频分片等避坑要点。
前言
在语音交互和音频处理领域,背景噪声一直是影响识别率和通话质量的痛点。阿里巴巴达摩院开源的 FRCRN (Frequency-Recurrent Convolutional Recurrent Network) 模型是目前的业界标峰之作,尤其在 DNS-Challenge 等国际赛事中表现卓越。
本文将带你从零开始,在自己的服务器上部署一个基于16k 单麦语音降噪服务。
1. 环境准备
首先,我们需要一个干净的 Python 环境(建议使用 Python 3.8 或 3.9)。
1.1 安装基础依赖
FRCRN 依赖 PyTorch 和 ModelScope 框架。执行以下命令安装:
# 安装 PyTorch (根据你的环境选择 CPU 或 GPU 版本)
# 这里以常用的 CUDA 11.7 为例,如果没有 GPU,直接 pip install torch
pip install torch torchvision torchaudio
如果你选择的直接配置好Pytorch的镜像就可以跳过以上这步
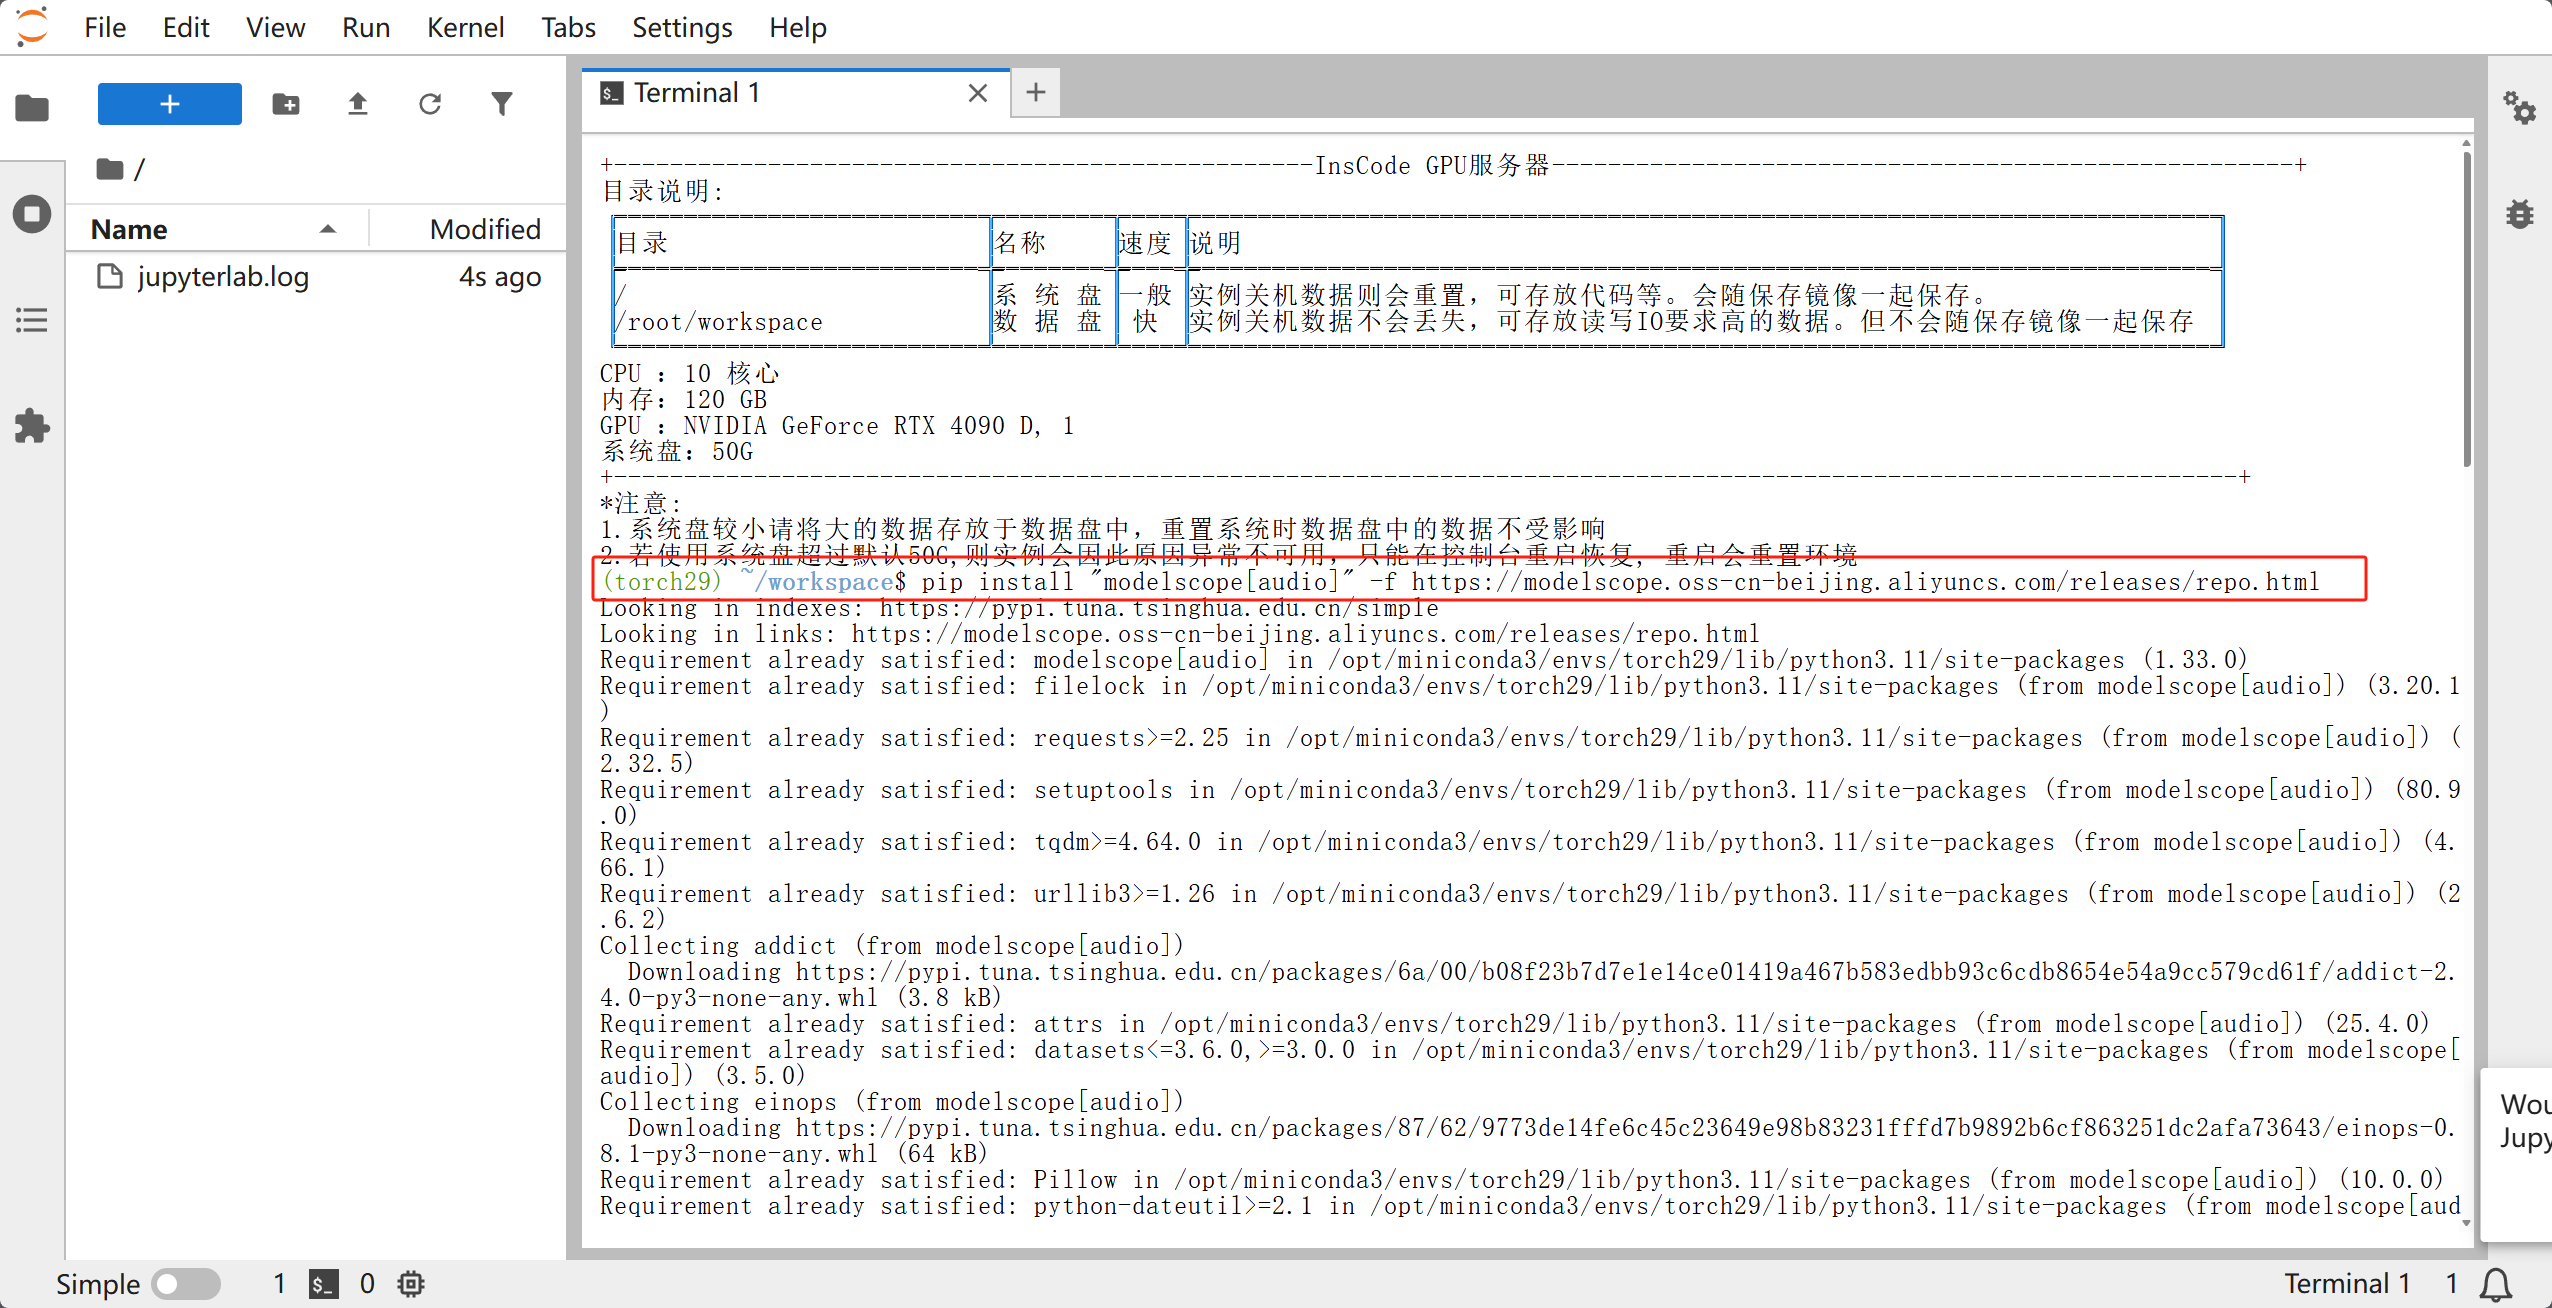
# 安装 ModelScope 音频相关库
pip install "modelscope[audio]" -f https://modelscope.oss-cn-beijing.aliyuncs.com/releases/repo.html
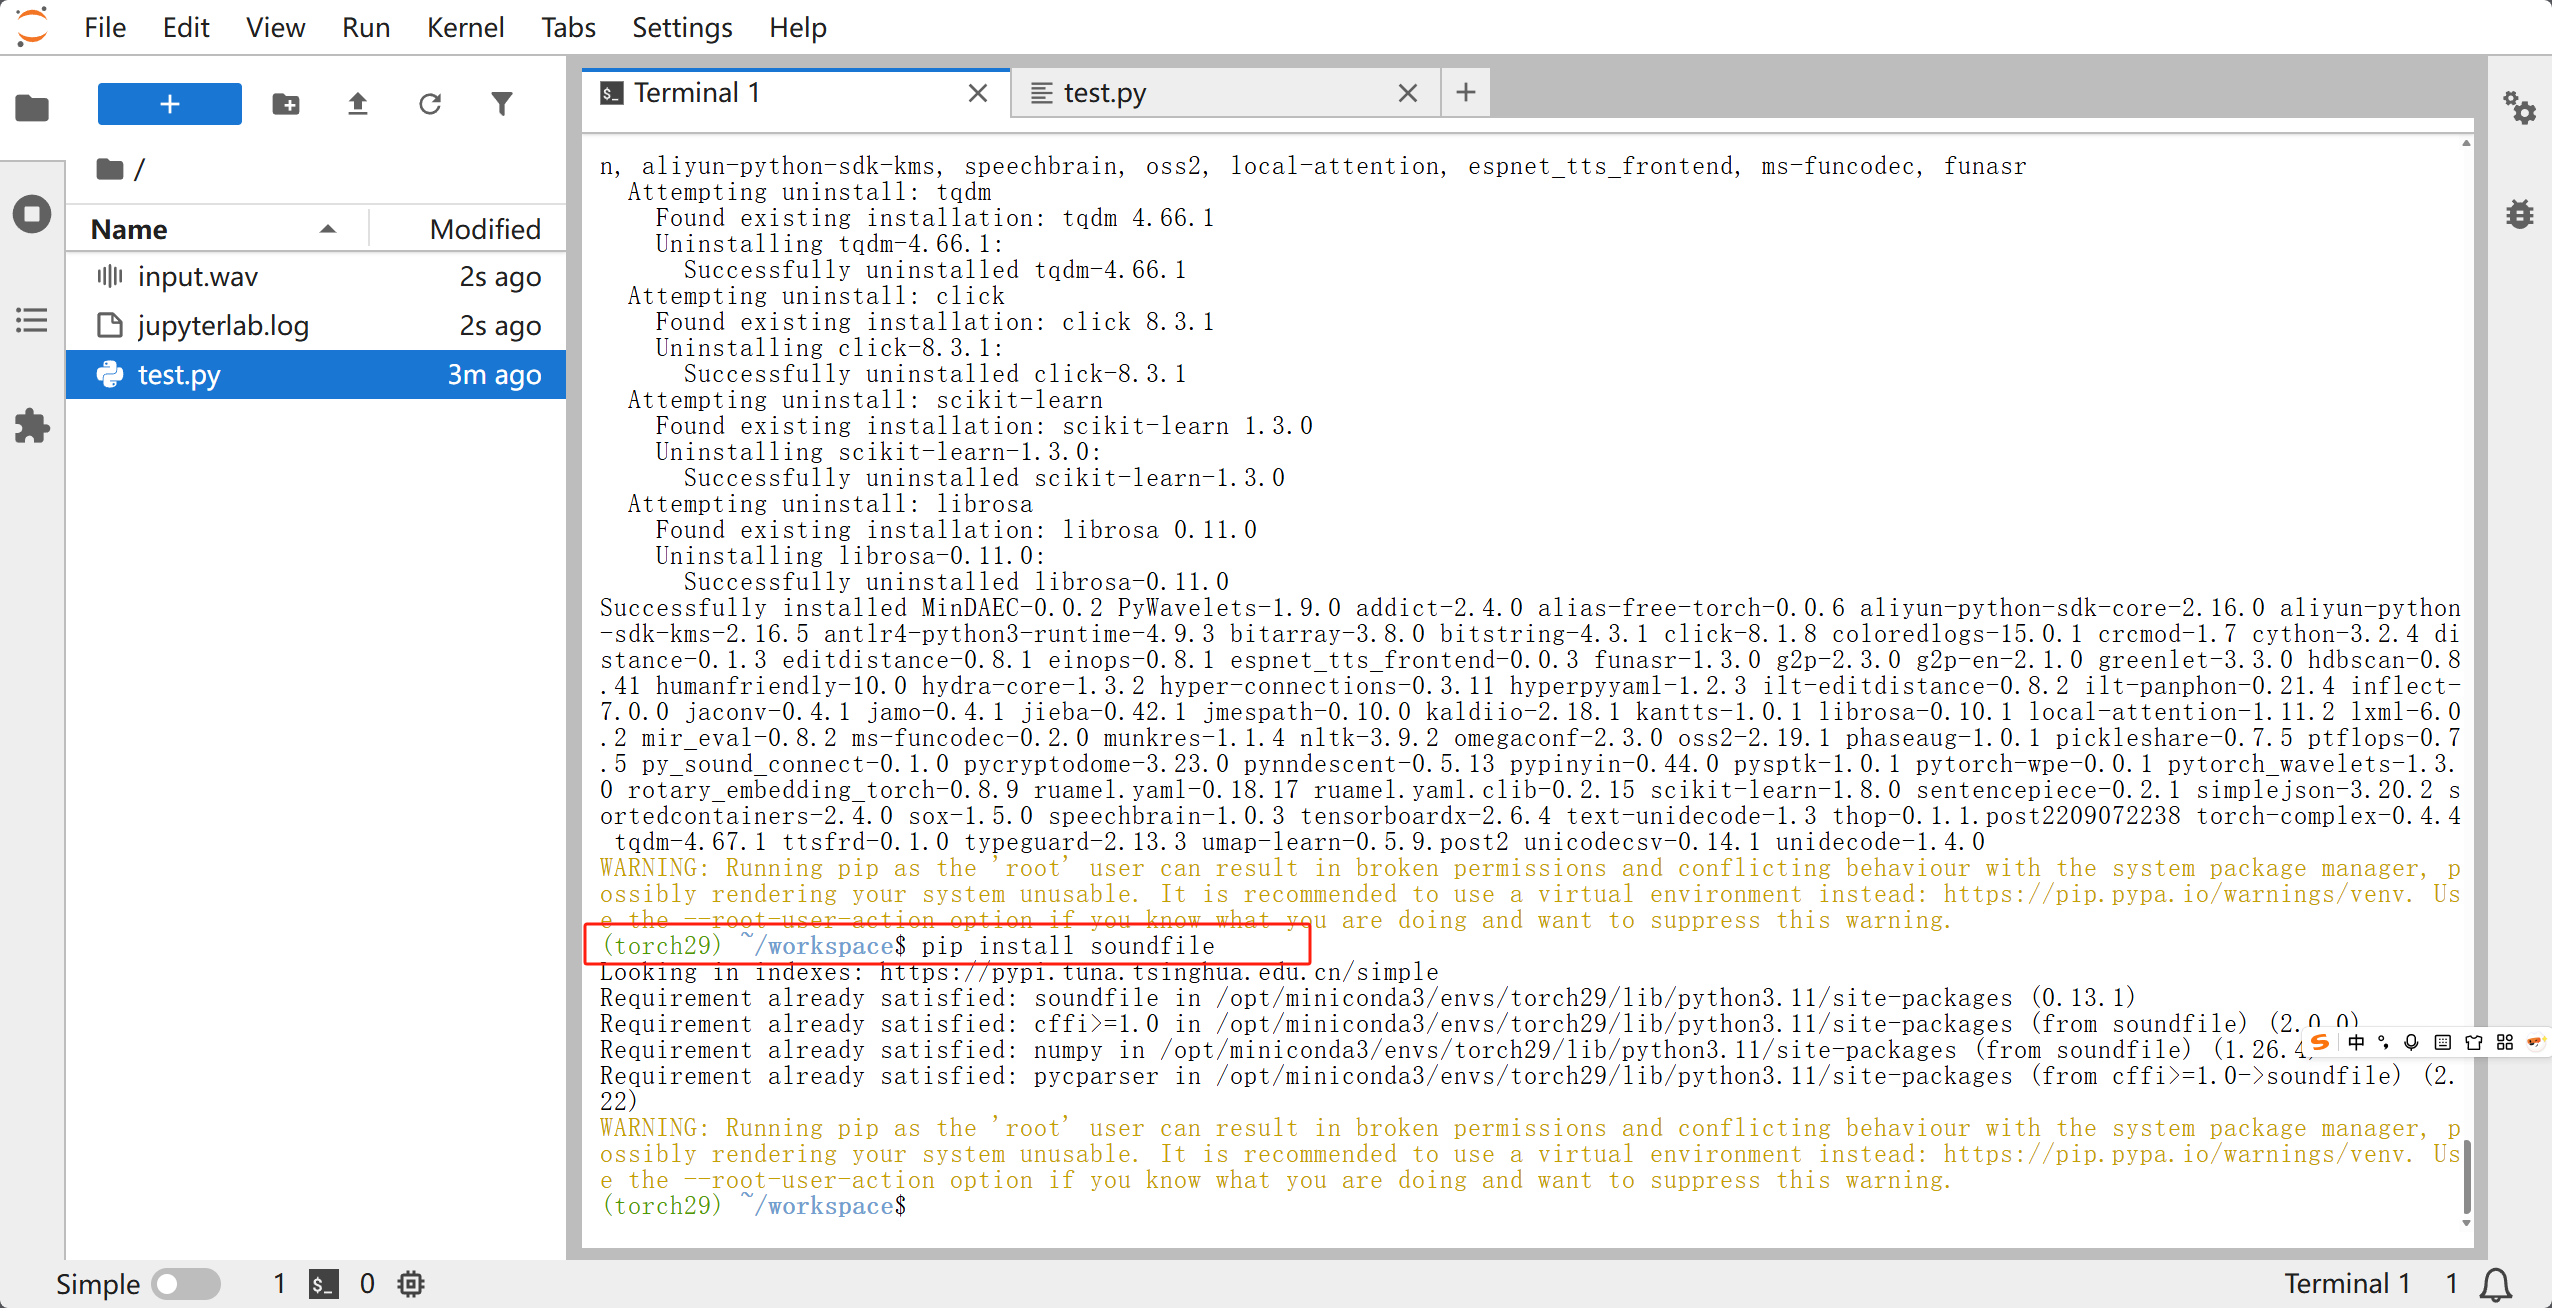
# 安装其他辅助库
pip install soundfile librosa
1.2 系统级依赖
如果你的系统中没有 ffmpeg,处理多种格式音频时可能会报错,建议安装:
- Ubuntu:
sudo apt-get install ffmpeg - CentOS:
yum install ffmpeg
2. 快速上手:几行代码实现降噪
在正式部署前,我们先写一个脚本验证模型是否能正常工作。
import os
from modelscope.pipelines import pipeline
from modelscope.utils.constant import Tasks
# 1. 初始化模型 pipeline
# 模型名称:damo/speech_frcrn_ans_cirm_16k
ans_pipeline = pipeline(
Tasks.acoustic_noise_suppression,
model='damo/speech_frcrn_ans_cirm_16k'
)
# 2. 指定输入输出文件
input_path = 'test_noisy.wav' # 确保这是一个 16k 采样率的 wav 文件
output_path = 'test_denoised.wav'
# 3. 执行降噪
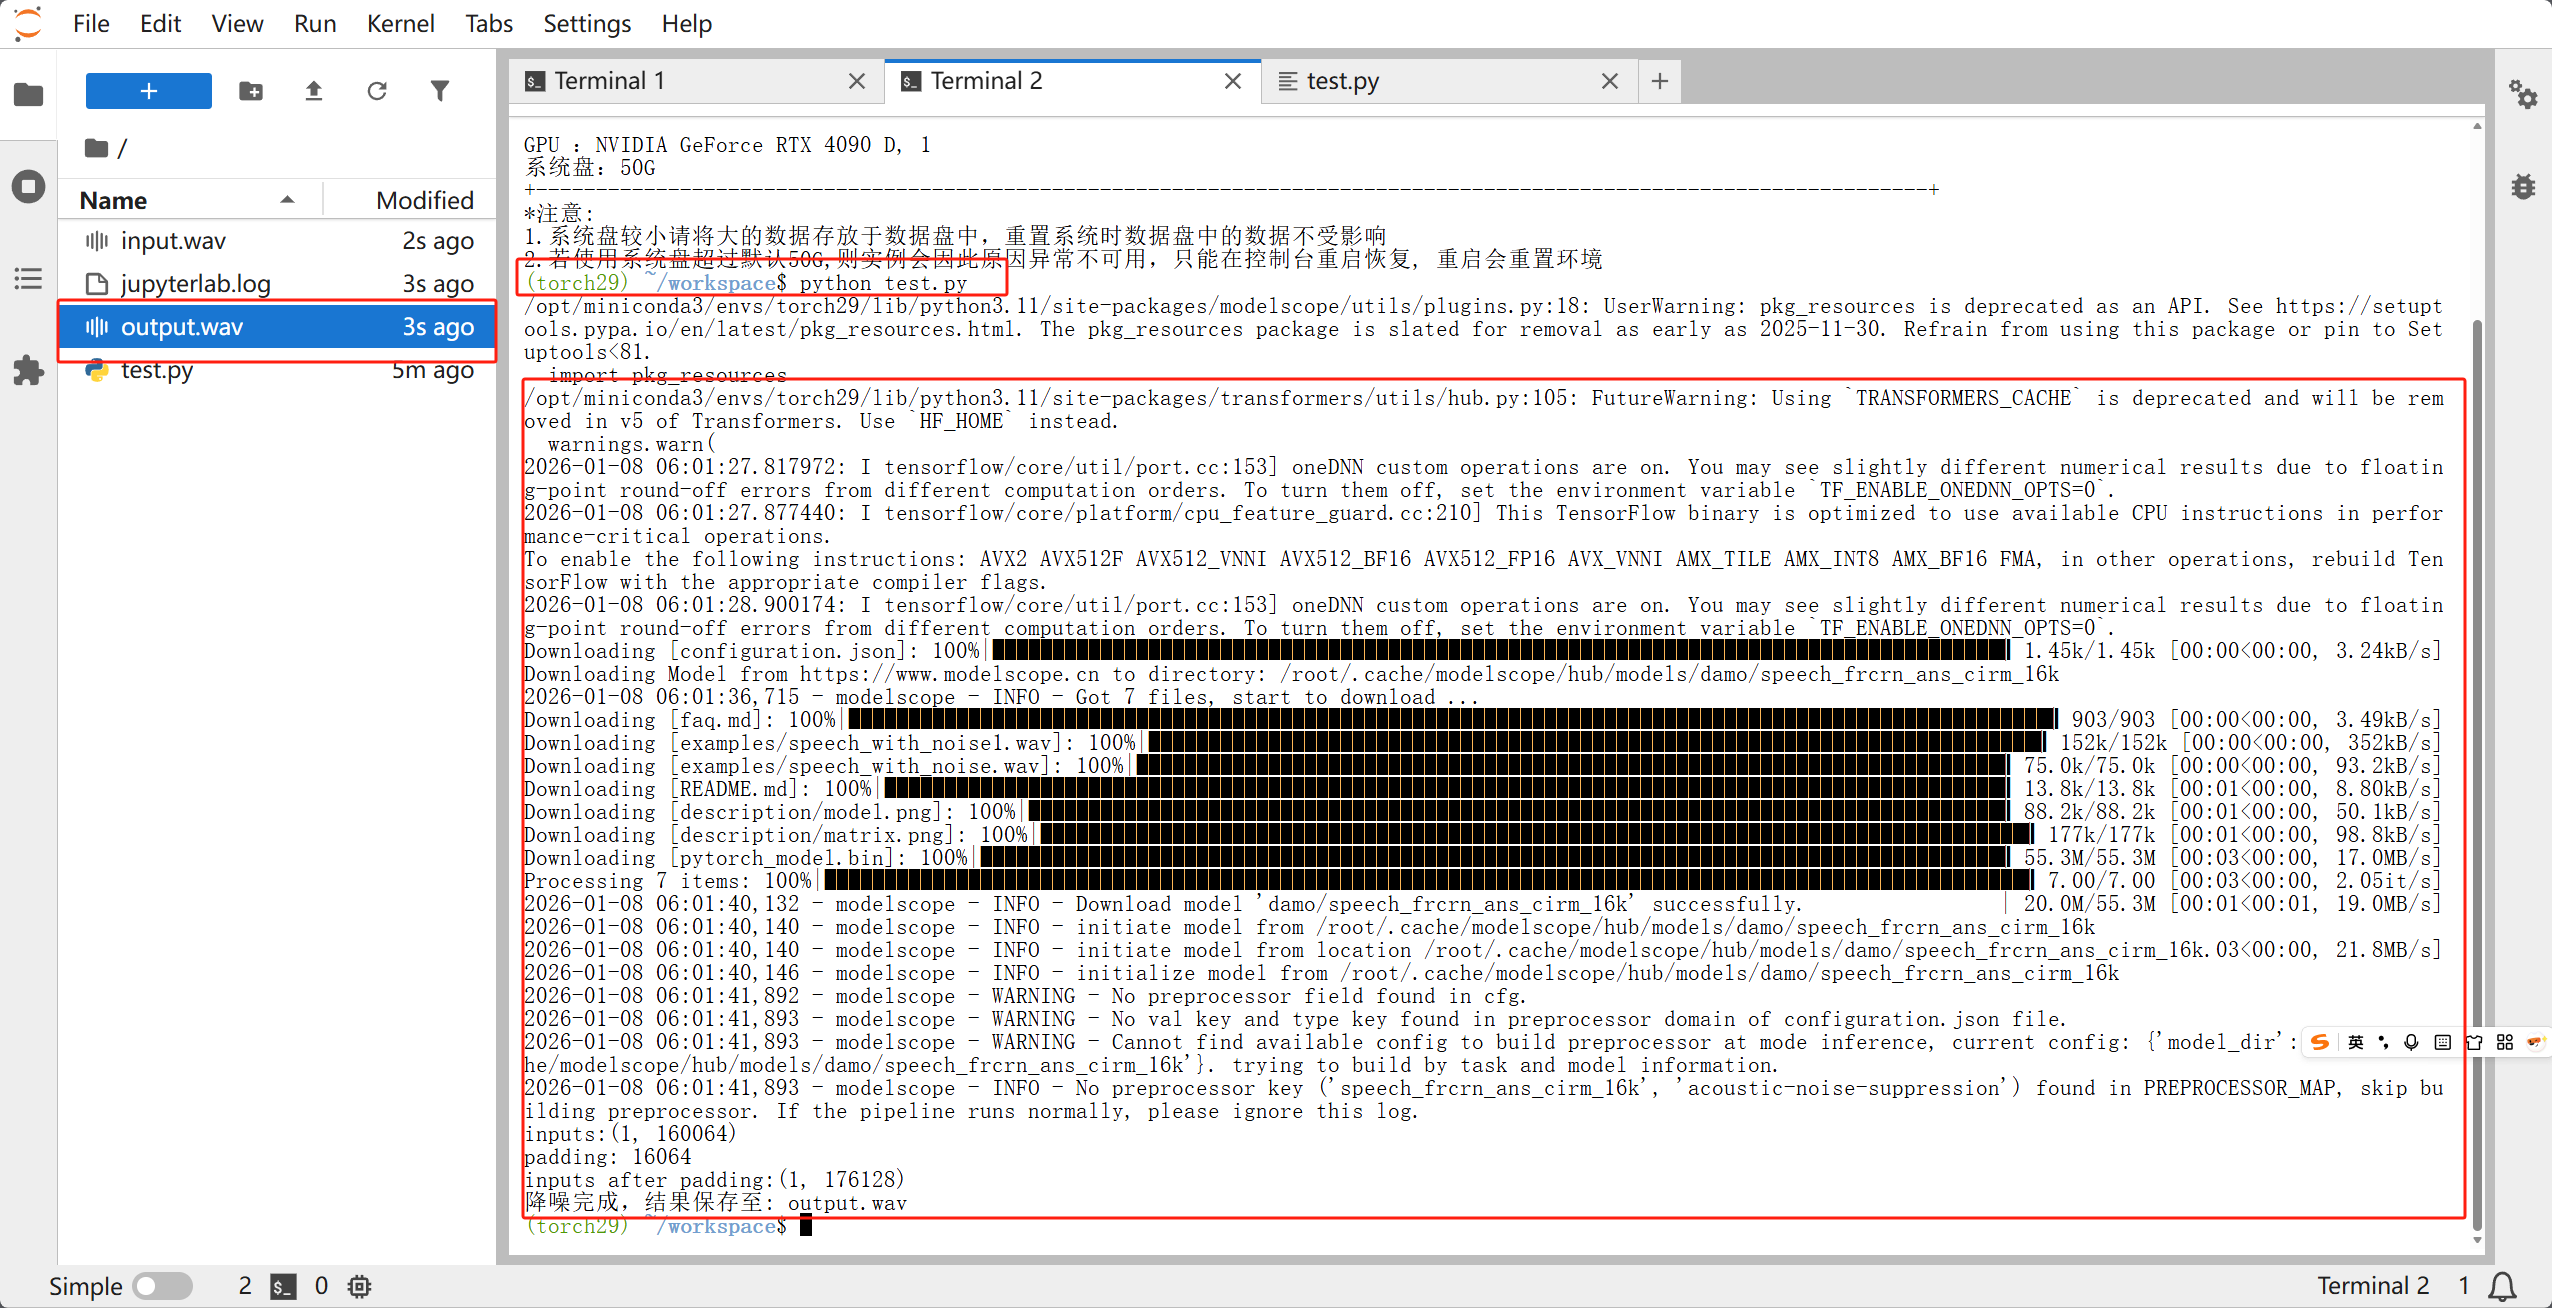
ans_pipeline(input_path, output_path=output_path)
print(f"处理完成!降噪后的音频已保存至:{output_path}")

第一次运行的时候会下载模型,模型不大,根据网络波动下载时间大概在一两分钟左右
3. 进阶:部署为 Web API 服务
为了让前端或其他微服务能够调用降噪功能,我们使用 FastAPI 封装一个接口。
3.1 安装 Web 框架
pip install fastapi uvicorn python-multipart
3.2 编写服务端代码 main.py
from fastapi import FastAPI, UploadFile, File, HTTPException
from fastapi.responses import FileResponse
from modelscope.pipelines import pipeline
from modelscope.utils.constant import Tasks
import shutil
import uuid
import os

app = FastAPI(title="FRCRN 语音降噪 API")

# 全局加载模型,避免每次请求重复加载耗时
print("Loading Model...")
ans_pipeline = pipeline(
    Tasks.acoustic_noise_suppression,
    model='damo/speech_frcrn_ans_cirm_16k'
)
print("Model Loaded!")

@app.post("/denoise")
async def denoise_api(file: UploadFile = File(...)):
    # 1. 生成唯一文件名,防止并发冲突
    task_id = str(uuid.uuid4())
    in_file = f"temp_in_{task_id}.wav"
    out_file = f"temp_out_{task_id}.wav"

    try:
        # 2. 保存上传的音频
        with open(in_file, "wb") as buffer:
            shutil.copyfileobj(file.file, buffer)

        # 3. 调用 FRCRN 推理
        ans_pipeline(in_file, output_path=out_file)

        # 4. 返回处理后的文件
        return FileResponse(out_file, media_type="audio/wav", filename="denoised.wav")

    except Exception as e:
        raise HTTPException(status_code=500, detail=str(e))

    finally:
        # 5. 清理临时输入文件(输出文件建议由后台定时清理或发送后删除)
        if os.path.exists(in_file):
            os.remove(in_file)

if __name__ == "__main__":
    import uvicorn
    uvicorn.run(app, host="0.0.0.0", port=8000)
4. 关键注意事项(避坑指南)
4.1 采样率必须是 16k
FRCRN 模型是针对 16kHz 采样率训练的。如果你的原始音频是 44.1k 或 48k,模型不会报错,但降噪效果会极其糟糕(声音变调或全是杂音)。
- 解决方法: 在调用模型前,先用
librosa进行重采样。
4.2 GPU 与 CPU 切换
- 如果有 NVIDIA 显卡且安装了 CUDA,ModelScope 会自动使用 GPU,推理速度极快。
- 如果显存不足,可以在初始化时强制指定 CPU:
ans_pipeline = pipeline(Tasks.acoustic_noise_suppression, model='...', device='cpu')
4.3 处理长音频
对于超过 5 分钟的长音频,直接处理可能会导致内存溢出(OOM)。建议在 API 层增加逻辑:将音频切分成 30 秒一段,逐段处理后再拼接。
5. 总结
通过 ModelScope 提供的 FRCRN 模型,我们可以极低成本地搭建出一套工业级的语音降噪系统。
部署流程回顾:
- 环境: PyTorch + ModelScope。
- 核心: 使用
pipeline调用damo/speech_frcrn_ans_cirm_16k。 - 服务化: 使用 FastAPI 提供远程调用接口。
- 规范: 严格控制输入音频采样率为 16,000Hz。
如果你正在寻找一种开源且效果稳健的降噪方案,FRCRN 绝对是目前单麦场景下的首选。
深度學習降噪利器:手把手教你三分鐘部署 FRCRN 單麥語音降噪程式
三分鐘部署阿里達摩院FRCRN 16k單麥降噪:ModelScope pipeline快速驗證,FastAPI封裝Web API,強調採樣率16k、GPU/CPU與長音訊分片等避坑要點。
來源:https://blog.csdn.net/2403_87969572/article/details/156704945
抓取時間(ISO本地):2026-05-18 05:17:30
前言
在語音互動和音訊處理領域,背景噪聲一直是影響識別率和通話質量的痛點。阿里巴巴達摩院開源的 FRCRN (Frequency-Recurrent Convolutional Recurrent Network) 模型是目前的業界標峰之作,尤其在 DNS-Challenge 等國際賽事中表現卓越。
本文將帶你從零開始,在自己的伺服器上部署一個基於16k 單麥語音降噪服務。
1. 環境準備
首先,我們需要一個乾淨的 Python 環境(建議使用 Python 3.8 或 3.9)。
1.1 安裝基礎依賴
FRCRN 依賴 PyTorch 和 ModelScope 框架。執行以下命令安裝:
# 安裝 PyTorch (根據你的環境選擇 CPU 或 GPU 版本)
# 這裡以常用的 CUDA 11.7 為例,如果沒有 GPU,直接 pip install torch
pip install torch torchvision torchaudio
如果你選擇的直接配置好Pytorch的映象就可以跳過以上這步
# 安裝 ModelScope 音訊相關庫
pip install "modelscope[audio]" -f https://modelscope.oss-cn-beijing.aliyuncs.com/releases/repo.html
# 安裝其他輔助庫
pip install soundfile librosa
1.2 系統級依賴
如果你的系統中沒有 ffmpeg,處理多種格式音訊時可能會報錯,建議安裝:
- Ubuntu:
sudo apt-get install ffmpeg - CentOS:
yum install ffmpeg
2. 快速上手:幾行程式碼實現降噪
在正式部署前,我們先寫一個指令碼驗證模型是否能正常工作。
import os
from modelscope.pipelines import pipeline
from modelscope.utils.constant import Tasks

# 1. 初始化模型 pipeline
# 模型名稱:damo/speech_frcrn_ans_cirm_16k
ans_pipeline = pipeline(
    Tasks.acoustic_noise_suppression,
    model='damo/speech_frcrn_ans_cirm_16k'
)

# 2. 指定輸入輸出檔案
input_path = 'test_noisy.wav'  # 確保這是一個 16k 取樣率的 wav 檔案
output_path = 'test_denoised.wav'

# 3. 執行降噪
ans_pipeline(input_path, output_path=output_path)

print(f"處理完成!降噪後的音訊已儲存至:{output_path}")
第一次執行的時候會下載模型,模型不大,根據網路波動下載時間大概在一兩分鐘左右
3. 進階:部署為 Web API 服務
為了讓前端或其他微服務能夠呼叫降噪功能,我們使用 FastAPI 封裝一個介面。
3.1 安裝 Web 框架
pip install fastapi uvicorn python-multipart
3.2 編寫服務端程式碼 main.py
from fastapi import FastAPI, UploadFile, File, HTTPException
from fastapi.responses import FileResponse
from modelscope.pipelines import pipeline
from modelscope.utils.constant import Tasks
import shutil
import uuid
import os

app = FastAPI(title="FRCRN 語音降噪 API")

# 全域性載入模型,避免每次請求重複載入耗時
print("Loading Model...")
ans_pipeline = pipeline(
    Tasks.acoustic_noise_suppression,
    model='damo/speech_frcrn_ans_cirm_16k'
)
print("Model Loaded!")

@app.post("/denoise")
async def denoise_api(file: UploadFile = File(...)):
    # 1. 生成唯一檔名,防止併發衝突
    task_id = str(uuid.uuid4())
    in_file = f"temp_in_{task_id}.wav"
    out_file = f"temp_out_{task_id}.wav"

    try:
        # 2. 儲存上傳的音訊
        with open(in_file, "wb") as buffer:
            shutil.copyfileobj(file.file, buffer)

        # 3. 呼叫 FRCRN 推理
        ans_pipeline(in_file, output_path=out_file)

        # 4. 返回處理後的檔案
        return FileResponse(out_file, media_type="audio/wav", filename="denoised.wav")

    except Exception as e:
        raise HTTPException(status_code=500, detail=str(e))

    finally:
        # 5. 清理臨時輸入檔案(輸出檔案建議由後臺定時清理或傳送後刪除)
        if os.path.exists(in_file):
            os.remove(in_file)

if __name__ == "__main__":
    import uvicorn
    uvicorn.run(app, host="0.0.0.0", port=8000)
4. 關鍵注意事項(避坑指南)
4.1 取樣率必須是 16k
FRCRN 模型是針對 16kHz 取樣率訓練的。如果你的原始音訊是 44.1k 或 48k,模型不會報錯,但降噪效果會極其糟糕(聲音變調或全是雜音)。
- 解決方法: 在呼叫模型前,先用
librosa進行重取樣。
4.2 GPU 與 CPU 切換
- 如果有 NVIDIA 顯示卡且安裝了 CUDA,ModelScope 會自動使用 GPU,推理速度極快。
- 如果視訊記憶體不足,可以在初始化時強制指定 CPU:
ans_pipeline = pipeline(Tasks.acoustic_noise_suppression, model='...', device='cpu')
4.3 處理長音訊
對於超過 5 分鐘的長音訊,直接處理可能會導致記憶體溢位(OOM)。建議在 API 層增加邏輯:將音訊切分成 30 秒一段,逐段處理後再拼接。
5. 總結
透過 ModelScope 提供的 FRCRN 模型,我們可以極低成本地搭建出一套工業級的語音降噪系統。
部署流程回顧:
- 環境: PyTorch + ModelScope。
- 核心: 使用
pipeline呼叫damo/speech_frcrn_ans_cirm_16k。 - 服務化: 使用 FastAPI 提供遠端呼叫介面。
- 規範: 嚴格控制輸入音訊取樣率為 16,000Hz。
如果你正在尋找一種開源且效果穩健的降噪方案,FRCRN 絕對是目前單麥場景下的首選。
Deep Learning Denoising: Deploy FRCRN Single-Mic Speech Denoising in Three Minutes
Deploy Alibaba FRCRN 16 kHz denoising via ModelScope and FastAPI in minutes—sampling rate, device choice, and chunking tips included.
Captured at (local ISO): 2026-05-18 05:17:30
Introduction
Background noise is a long-standing pain point in speech interaction and audio processing. Alibaba DAMO Academy’s open-source FRCRN (Frequency-Recurrent Convolutional Recurrent Network) is a top-tier solution and has performed strongly in benchmarks such as DNS-Challenge. This guide walks you through deploying a 16 kHz single-microphone denoising service on your own server.
1. Environment Setup
Use a clean Python environment (3.8 or 3.9 recommended).
1.1 Install core dependencies
FRCRN depends on PyTorch and ModelScope:
# Install PyTorch (choose CPU or GPU build for your environment)
# Example for CUDA 11.7; without GPU: pip install torch
pip install torch torchvision torchaudio
If you use a preconfigured PyTorch image, you can skip the step above.
# ModelScope audio extras
pip install "modelscope[audio]" -f https://modelscope.oss-cn-beijing.aliyuncs.com/releases/repo.html
# Helper libraries
pip install soundfile librosa
1.2 System dependencies
Install ffmpeg if missing (helps with multiple audio formats):
- Ubuntu:
sudo apt-get install ffmpeg - CentOS:
yum install ffmpeg
2. Quick start: denoise in a few lines
Verify the model before full deployment:
import os
from modelscope.pipelines import pipeline
from modelscope.utils.constant import Tasks

# 1. Init pipeline
# Model: damo/speech_frcrn_ans_cirm_16k
ans_pipeline = pipeline(
    Tasks.acoustic_noise_suppression,
    model='damo/speech_frcrn_ans_cirm_16k'
)

# 2. Input / output paths
input_path = 'test_noisy.wav'  # Must be 16 kHz WAV
output_path = 'test_denoised.wav'

# 3. Run denoising
ans_pipeline(input_path, output_path=output_path)

print(f"Done! Output saved to: {output_path}")
The first run downloads the model (about 1–2 minutes depending on network).
3. Advanced: Web API with FastAPI
Wrap denoising as an HTTP API for frontends or microservices.
3.1 Install web stack
pip install fastapi uvicorn python-multipart
3.2 Server code main.py
from fastapi import FastAPI, UploadFile, File, HTTPException
from fastapi.responses import FileResponse
from modelscope.pipelines import pipeline
from modelscope.utils.constant import Tasks
import shutil
import uuid
import os

app = FastAPI(title="FRCRN Speech Denoising API")

# Load model once at startup
print("Loading Model...")
ans_pipeline = pipeline(
    Tasks.acoustic_noise_suppression,
    model='damo/speech_frcrn_ans_cirm_16k'
)
print("Model Loaded!")

@app.post("/denoise")
async def denoise_api(file: UploadFile = File(...)):
    task_id = str(uuid.uuid4())
    in_file = f"temp_in_{task_id}.wav"
    out_file = f"temp_out_{task_id}.wav"

    try:
        with open(in_file, "wb") as buffer:
            shutil.copyfileobj(file.file, buffer)

        ans_pipeline(in_file, output_path=out_file)

        return FileResponse(out_file, media_type="audio/wav", filename="denoised.wav")

    except Exception as e:
        raise HTTPException(status_code=500, detail=str(e))

    finally:
        if os.path.exists(in_file):
            os.remove(in_file)

if __name__ == "__main__":
    import uvicorn
    uvicorn.run(app, host="0.0.0.0", port=8000)
4. Pitfalls
4.1 Sample rate must be 16 kHz
FRCRN is trained for 16 kHz. Feeding 44.1 kHz or 48 kHz audio may not error but quality will be poor (pitch artifacts or noise).
- Fix: Resample with
librosabefore inference.
4.2 GPU vs CPU
- With NVIDIA GPU + CUDA, ModelScope uses GPU automatically.
- Low VRAM: force CPU at init:
ans_pipeline = pipeline(Tasks.acoustic_noise_suppression, model='...', device='cpu')
4.3 Long audio
Clips over ~5 minutes may OOM. Split into ~30 s segments in the API layer and concatenate outputs.
5. Summary
ModelScope’s FRCRN lets you build industrial-grade denoising cheaply.
Recap:
- Stack: PyTorch + ModelScope.
- Core:
pipeline+damo/speech_frcrn_ans_cirm_16k. - Serving: FastAPI endpoint.
- Rule: Input audio at 16,000 Hz.
For a stable open-source single-mic denoiser, FRCRN is an excellent default choice.